

How to get started with a Dynamics 365 free trial
Two methods that we can use to get a Dynamics 365 free trial:
Dynamics 365 apps trial
by this way, we can get CDS database, plus Microsoft pre-built apps (Sales, Services, Marketing, etc.)
Power Apps trial
through this method, we can only get the CDS database with a few pre-defined core entities, such as Contact, Account, ect)
if you are a beginner, normally, I suggest that you go with the method #1, which will help you get familiar with the existing Apps before you know how to make a app properly using Power Apps.
So in this article, we will show you how to get a Dynamics 365 free trial instance through method #1 (Dynamics 365 apps trial), and below is the steps you have to follow to get there:
Steps for getting a Dynamics 365 free trial instance through method #1
Step 1 Microsoft Official Website for Dynamics 365 free trial
go to https://dynamics.microsoft.com/en-ca/dynamics-365-free-trial/ to sign up, then you will see different apps available on the same page, and you can just choose the first app called Sales, then click on Try for free.

Step 2 How to populate the information on the first page
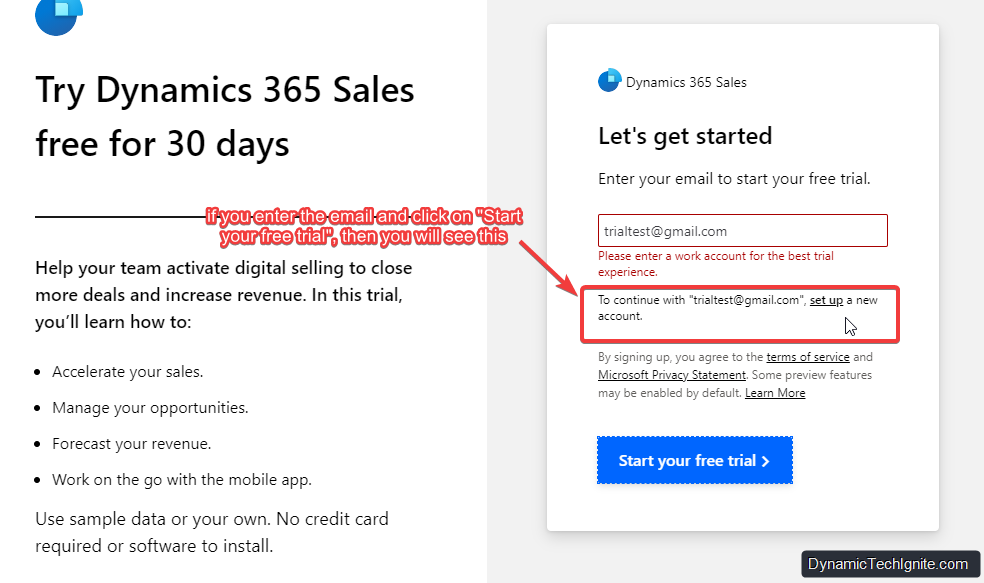
if you enter the email directly in the textbox under "Enter your email to start your free trial", and click on "Start your free trial", then you will see below information indicated in below red rectangle.
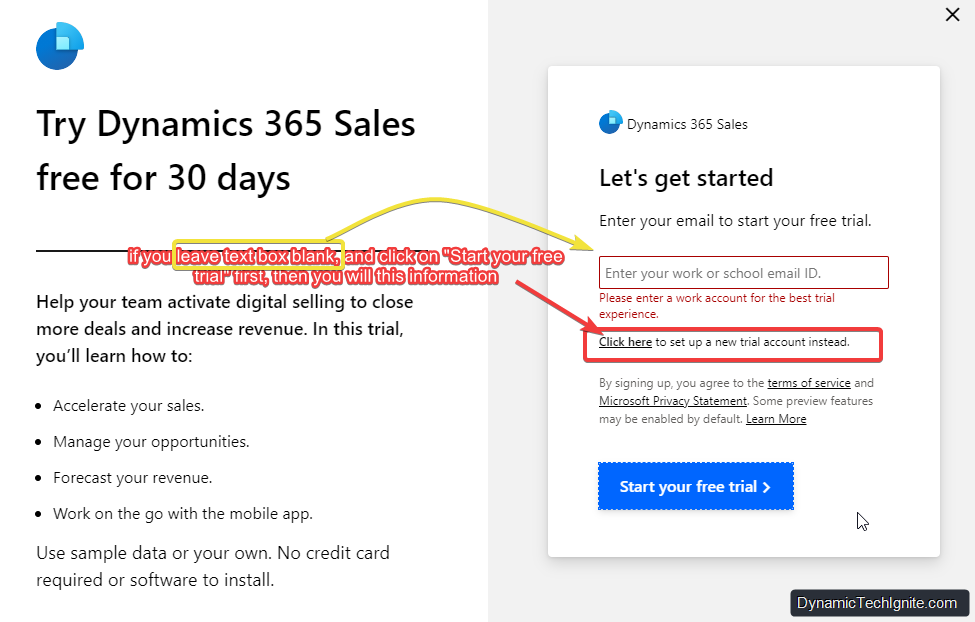
but I suggest that you can just leave text box blank, and click on "Start your free trial" first, then you will see below information
Step 3 Detailed Steps of Applying for a Free Trial
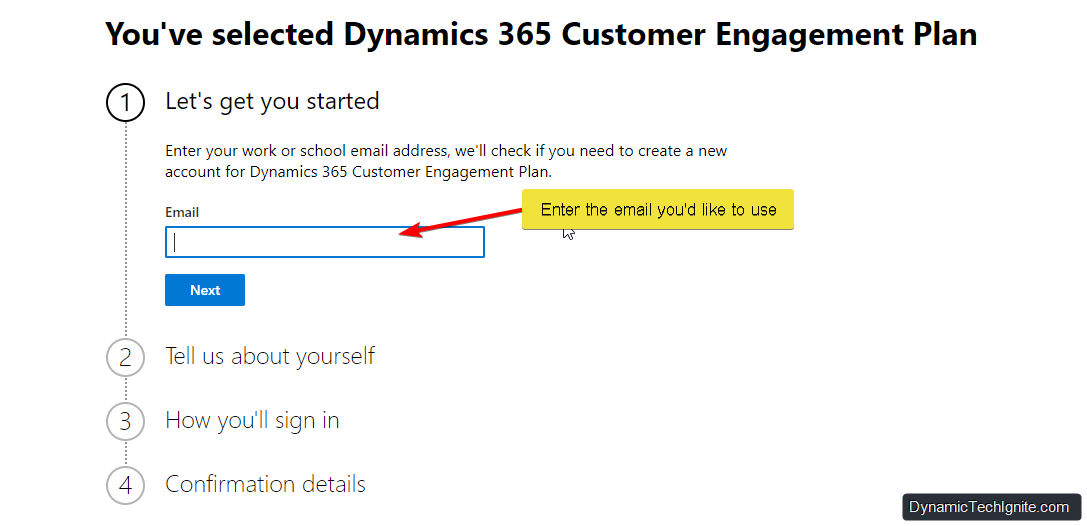
then you will see below information, and text box where you can enter the email that you’d like to use (btw, you can provide your personal email address instead of business email address)
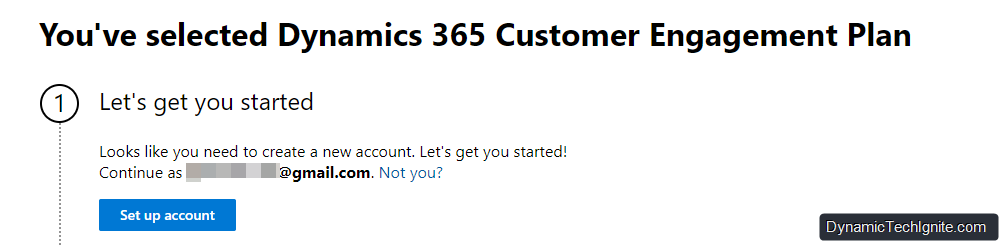
then you will below information, and you can go ahead to click on "Set up account" button.
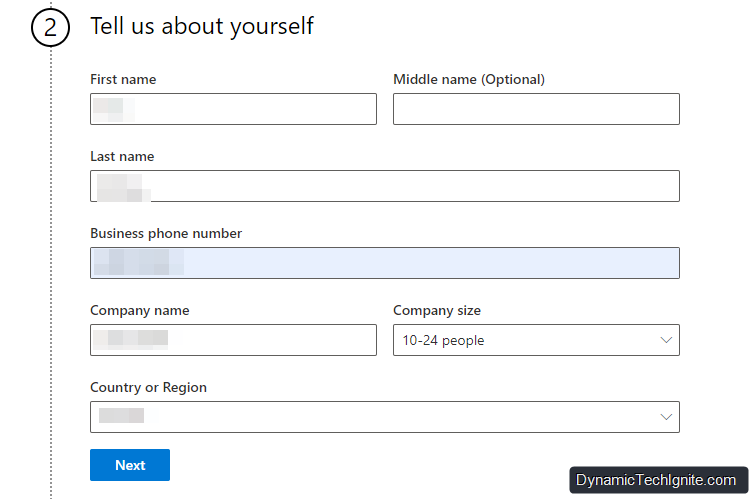
after that, you can continue to populate below fields accordingly, then click on "Next" (tip: Country or Region is important, as Microsoft will create this trial under the data center where is close to your selection)
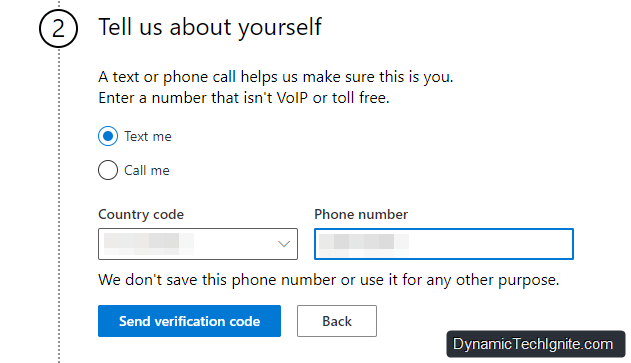
then you need to double check the country code and phone number to ensure nothing wrong, and also choose either "Text me" or "Call me". for instance, we will choose Text me, and we will get the verification code through the phone number provided by us,
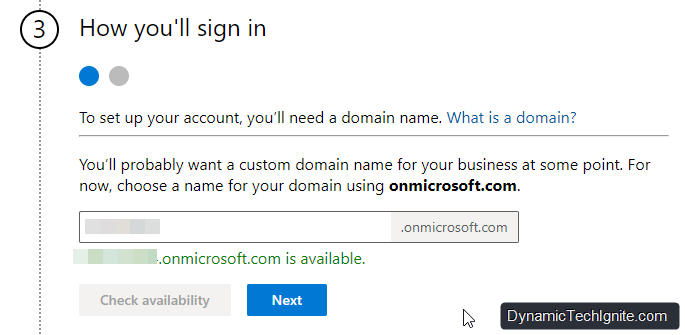
next, please choose a name for your domain using onmicrosoft.com (this name will be used to create your Office/Microsoft 365 account, and also as a temporary email address for you until your business custom domain is configured), and then check availability(ensure the name is unique), then click on Next if it’s available
then you can populate the name for your user ID, and also double enter the password that you prefer, and then click on Sign up

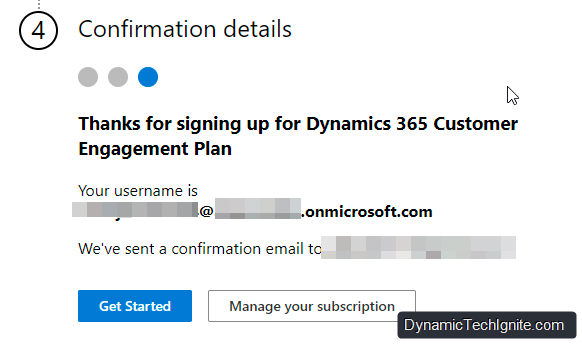
finally, you can review and confirm the details which you will use to log in later on(tip: you should note them down somewhere in case you will need to use them later when log in again), then you can click on Get Started to start interact with the trial instance.
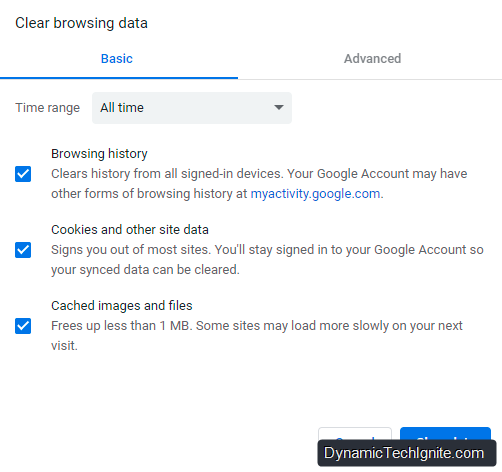
Step 4 Clear browsing data(optional)
sometime, some of you may have got the trial instance before, and now just try to apply for another one. if that’s the case, you may come across below log-in issue.
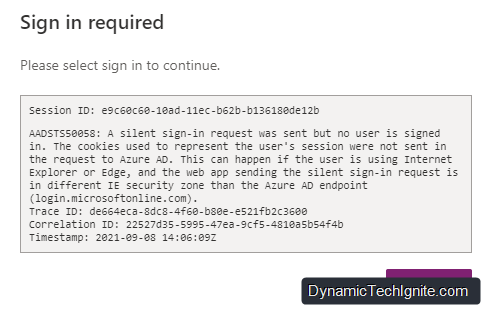
then what you have to do is to clear your browsing data (below is a example when doing it from Chrome)
Step 5 How to create a new environment that has a CDS built for it
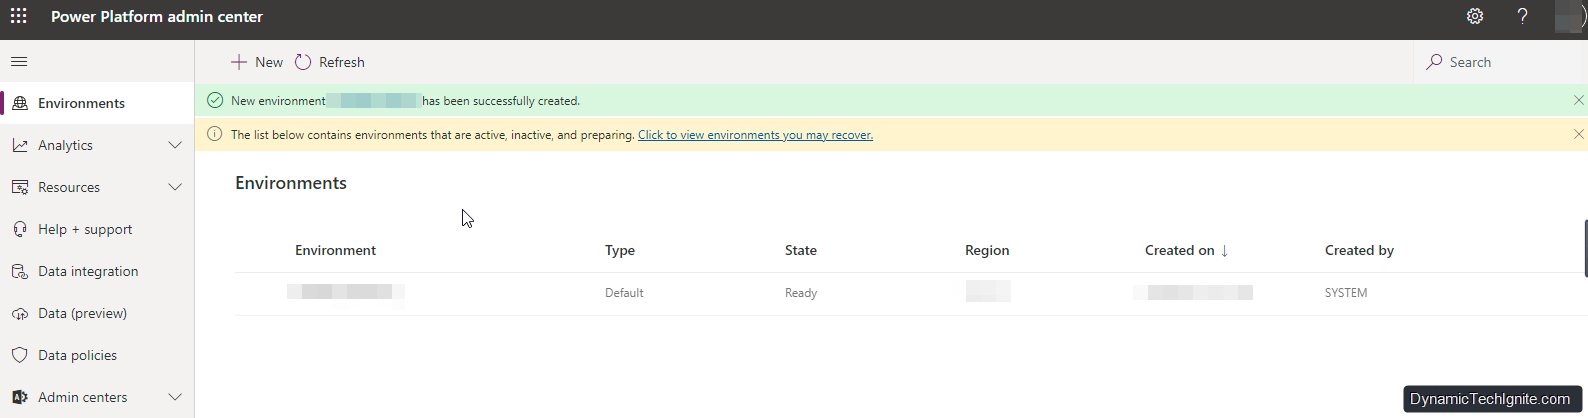
Once you log in (https://admin.powerplatform.microsoft.com/) successfully, you will see below Power Platform admin center page where you can configure and manage different environments (instances) of Power Platform. You should not use the existing default environment that you see on the page, instead you should create a new environment that will has a CDS (database) configured for it automatically by the Microsoft. so then what you need to do is just click on "+ New" button on the top-left.
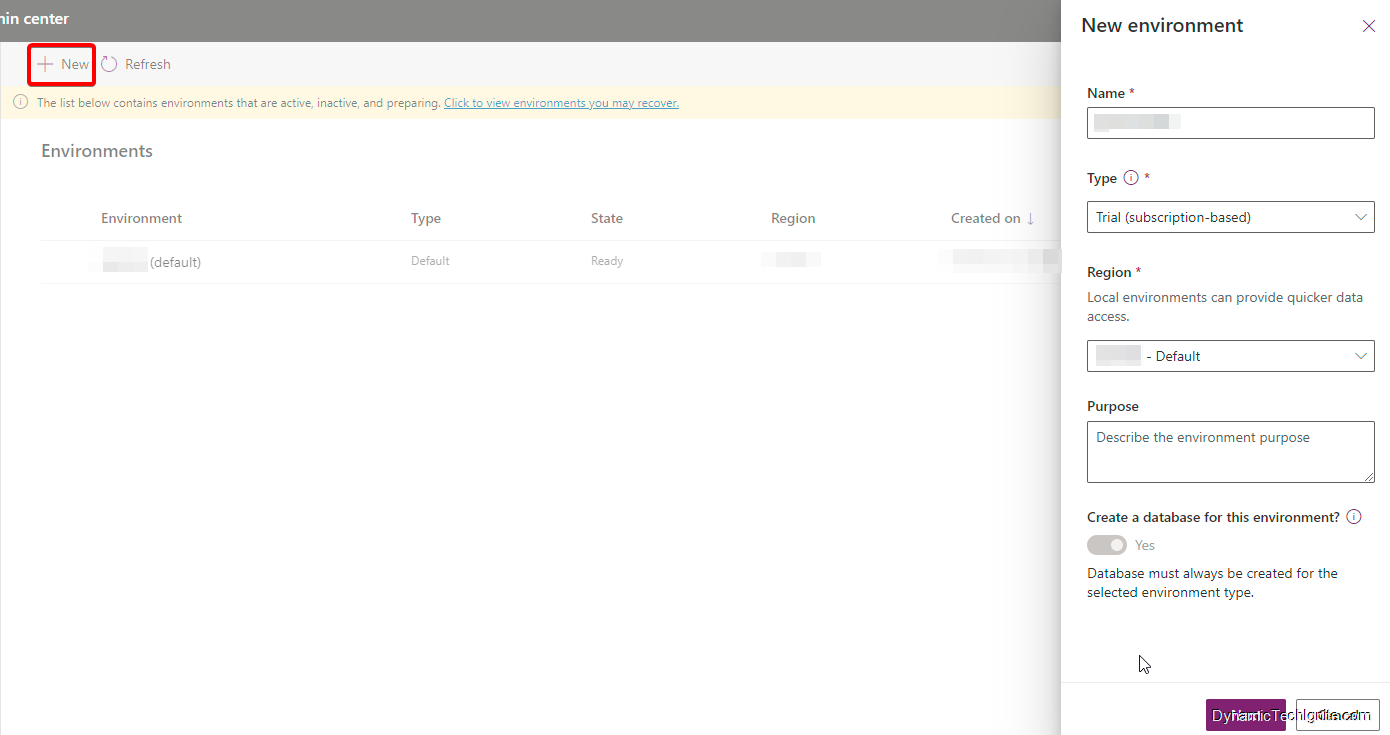
after clicking on the New button, you will have to populate the Name field with the name you prefer, and then choose Trial (subscription-based) for the Type field, and also choose the closest location (data center) for Region field. then, clicking on Next at the bottom. (you will see that option "create a database for this environment" greyed out, and being set up "Yes" automatically, which means the CDS for this new environment will be configured automatically).
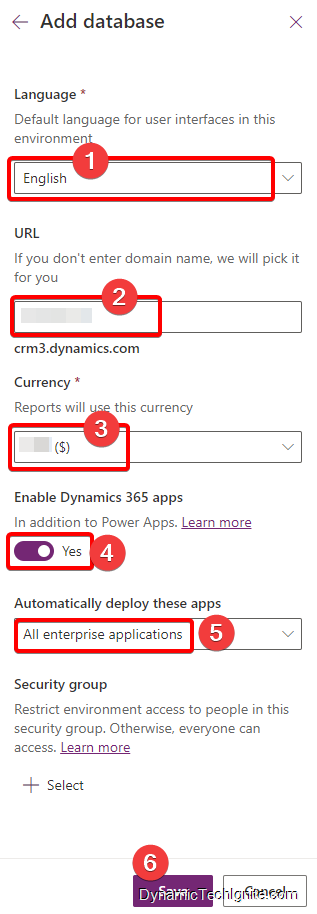
next, you will have to go through below steps:
- choose the Language,
- enter the custom domain name you have (otherwise it will use the default one, something like org7a5fae65), which can be changed later on as well.
- choose the currency for the entire environment
- if you’re a beginner, I suggest that you also enable Dynamics 365 apps
- and choose All enterprise applications
- finally, click on Save button
at the end, you will see another environment has been created other than the default one. Please note that there is no database behind the default environment.

after above steps, you will be able to start using the Dynamics 365 Apps, such as Sales hub, Customer Service hub, etc.
0 comments:
Post a Comment