A Place for Sharing and Inspiration

Total Pageviews

Showing posts with label Power Automate. Show all posts

Wednesday, September 29, 2021

Tip - How to set up a Condition in Power Automate flow to check if "the field is empty"


Scenario:

sometimes, we have to check if the field contain data or is empty under the Condition action in a Power Automate flow, and we may be confused about which expression should be used to set up the condition.
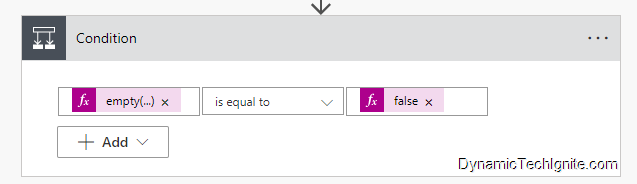
image-20210929204201649

Reference material from Microsoft

If you use logical functions or conditions to compare values, null values are converted to empty string ("") values. The behavior of conditions differs when you compare with an empty string instead of a null value. For more information, see the string() function.

Refer to below link for more details from Microsoft:

https://docs.microsoft.com/en-us/azure/logic-apps/workflow-definition-language-functions-reference#logical-comparison-functions

"empty" function

Check whether a collection is empty. Return true when the collection is empty, or return false when not empty.

Copy

empty('<collection>')empty([<collection>])
ParameterRequiredTypeDescription
<collection>YesString, Array, or ObjectThe collection to check
Return valueTypeDescription
true or falseBooleanReturn true when the collection is empty. Return false when not empty.

Example

These examples check whether the specified collections are empty:

Copy

empty('')empty('abc')

And returns these results:

  • First example: Passes an empty string, so the function returns true.
  • Second example: Passes the string "abc", so the function returns false.

Refer to below link for more details from Microsoft:

https://docs.microsoft.com/en-us/azure/logic-apps/workflow-definition-language-functions-reference#empty

On the left side of the condition

"empty" function

empty([DynamicValue])e.g. empty(triggerOutputs()?['body/address1_city'])

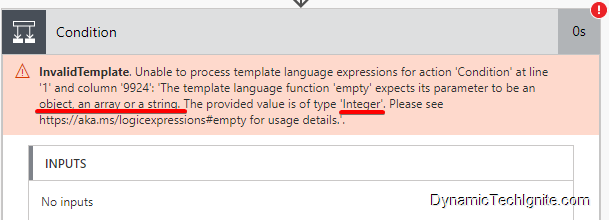
but please note that the type of DynamicValue should be String, Array, or Object only (most of time, it will be a string type), otherwise, you will see an error, for instance, if we try to use a option set (choice) field in the Empty function indicated below, then we will see below error message during the run.

e.g.empty(triggerOutputs()?['body/preferredcontactmethodcode'])
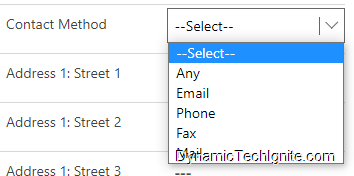
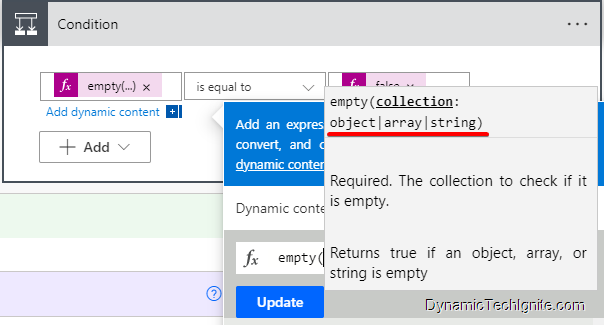
image-20210929205305113

image-20210929211239611

image-20210929205614055

"length" function

length([DynamicValue])e.g.length(outputs('retrieve_option')?['body/methodToUpdate'])

but please note that the type of DynamicValue should be String, Array only. for instance, you can use it to check the length of an array in order to verify if the file or option exists. If it’s greater than 0, the array is not empty. If it’s 0, then it’s empty.
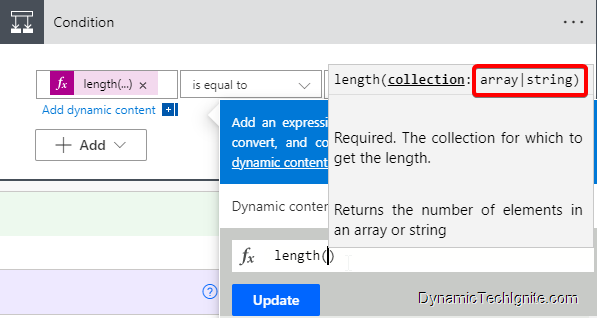
image-20210929211306283

On the right side of the condition

If you intend to check if a field is empty or not (on the right side of the condition) , and then do something. there are also couple of ways you can refer to.

null keyword

Just open the expression builder as below pic shown, and enter null, then you will see below predefined value “null” show up, after that, you can just click on Update to add it in the condition on the right side for comparison.
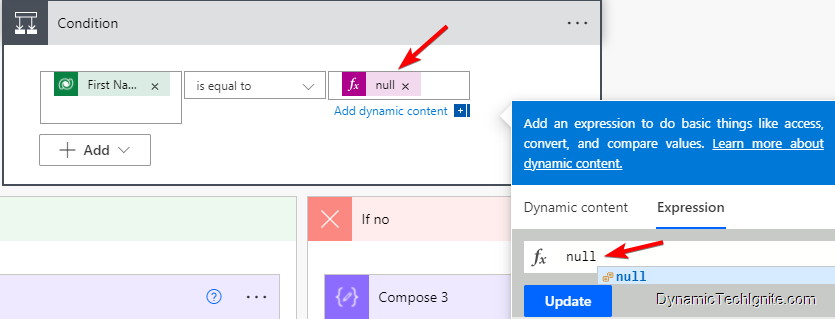
image-20210929212043686

empty string ("") value

if you‘re sure that the data type of the field you’re using on the left side of the condition is a string, then you can just put empty string on the right side for comparison.
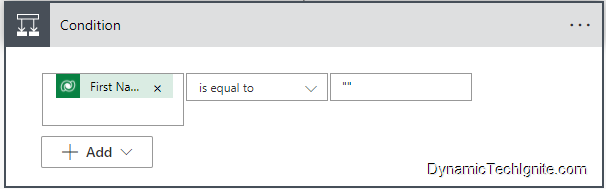
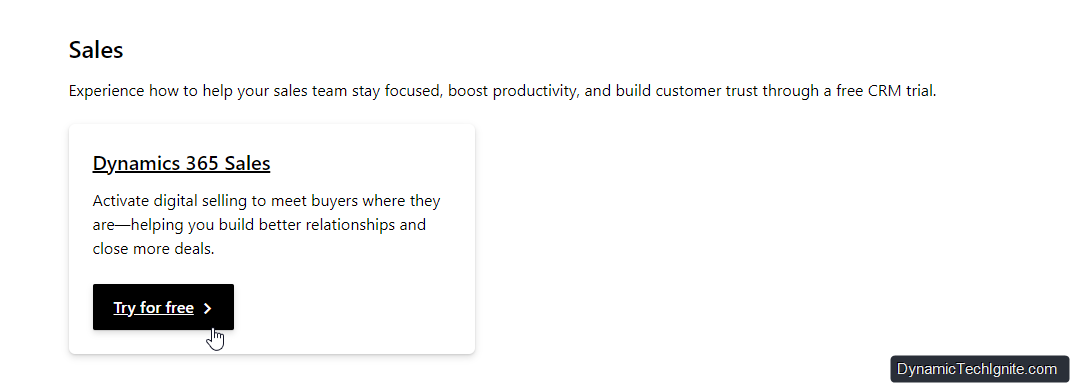
image-20210929213239343

Sunday, September 12, 2021

Types of Power Automate flows


Power Automate is a service that you can use to automate repetitive tasks to bring efficiencies to any organizations.

You can create cloud flows, desktop flows, or business process flows.

TypeTriggerUse caseAutomation target
Automated flowCloud flowAn eventCreate an automation that is triggered by an event, such as an incoming email from a specific client, or a comment of your company in social media.Connectors for cloud or on-premises services connect your accounts and enable them to talk to each other.
Instant flowCloud flowA click of a buttonStart an automation with a click of a button. You can automate for repetitive tasks from your Desktop or Mobile devices. For example, instantly send a reminder to the team with a push of a button from your mobile device.Automate any task. Wide range of tasks such as requesting an approval, an action in Teams or SharePoint.
Schedule flowCloud flowA (reoccurring) timeSchedule an automation such as daily data upload to SharePoint or a database, or send a email to client at certain time on daily basisTasks that need to be automated on a schedule.
Desktop (UI) flowDesktop or websiteAny of aboveTo trigger desktop flows through Power Automate, you have to use machines or machine groups. Below are some use cases: 1. Quickly organize your documents using dedicated files and folders actions; 2. Accurately extract data from websites and store them in excel files using Web and Excel automation; 3.Apply desktop automation capabilities to put your work on autopilotRecords and automates a process in the desktop and website. Alternatively, you can use the two legacy methods of creating desktop flows: Windows recorder (V1) and Selenium ID.
Business process flowA component of Dynamics 365 based on Dataverse(CDS)Any of aboveEnsure that people enter data consistently and follow the same steps every time they work with a customer by creating a business process flow. For example, 1. You might want to create a business process flow to have everyone handle customer service requests the same way. 2. Onboarding and training new employees. 3. Nurturing sales leads and closing the loop on opportunitiesProvide a guide for people to get work done. Use business process flows to define a set of steps for people to follow to take them to a desired outcome.

Wednesday, September 8, 2021

How to get started with a Dynamics 365 free trial


Two methods that we can use to get a Dynamics 365 free trial:

  1. Dynamics 365 apps trial

    by this way, we can get CDS database, plus Microsoft pre-built apps (Sales, Services, Marketing, etc.)

  2. Power Apps trial

    through this method, we can only get the CDS database with a few pre-defined core entities, such as Contact, Account, ect)

if you are a beginner, normally, I suggest that you go with the method #1, which will help you get familiar with the existing Apps before you know how to make a app properly using Power Apps.

So in this article, we will show you how to get a Dynamics 365 free trial instance through method #1 (Dynamics 365 apps trial), and below is the steps you have to follow to get there:

Steps for getting a Dynamics 365 free trial instance through method #1

Step 1 Microsoft Official Website for Dynamics 365 free trial

go to https://dynamics.microsoft.com/en-ca/dynamics-365-free-trial/ to sign up, then you will see different apps available on the same page, and you can just choose the first app called Sales, then click on Try for free.

image-20210907233519100

Step 2 How to populate the information on the first page

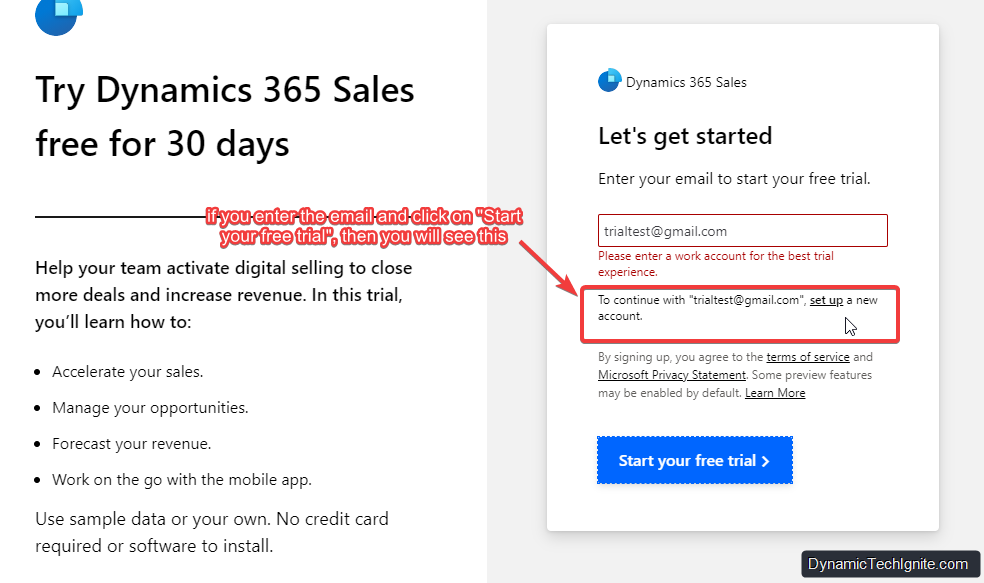
if you enter the email directly in the textbox under "Enter your email to start your free trial", and click on "Start your free trial", then you will see below information indicated in below red rectangle.

image-20210907235004551

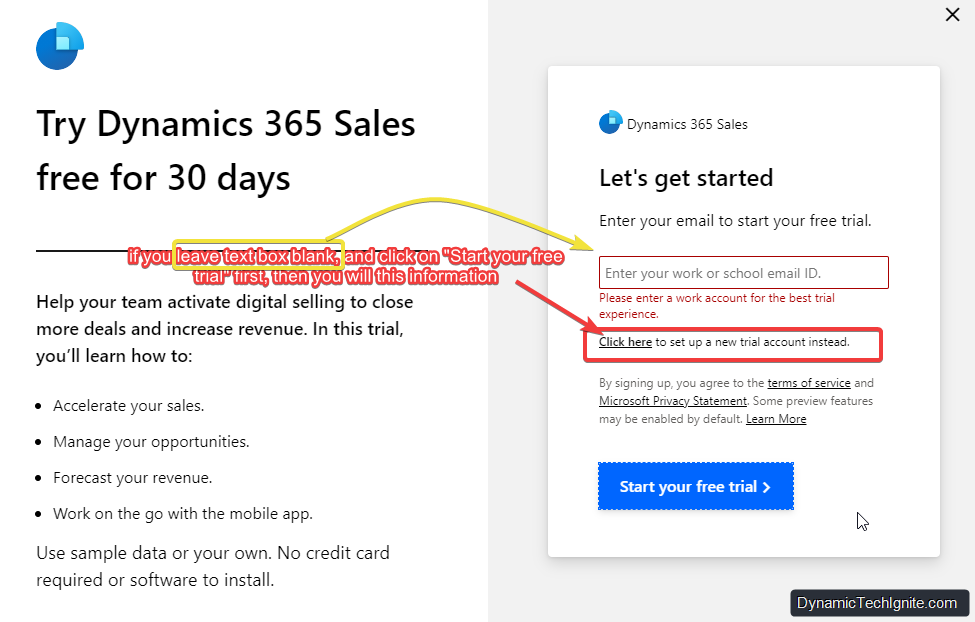
but I suggest that you can just leave text box blank, and click on "Start your free trial" first, then you will see below information

image-20210907235651634

Step 3 Detailed Steps of Applying for a Free Trial

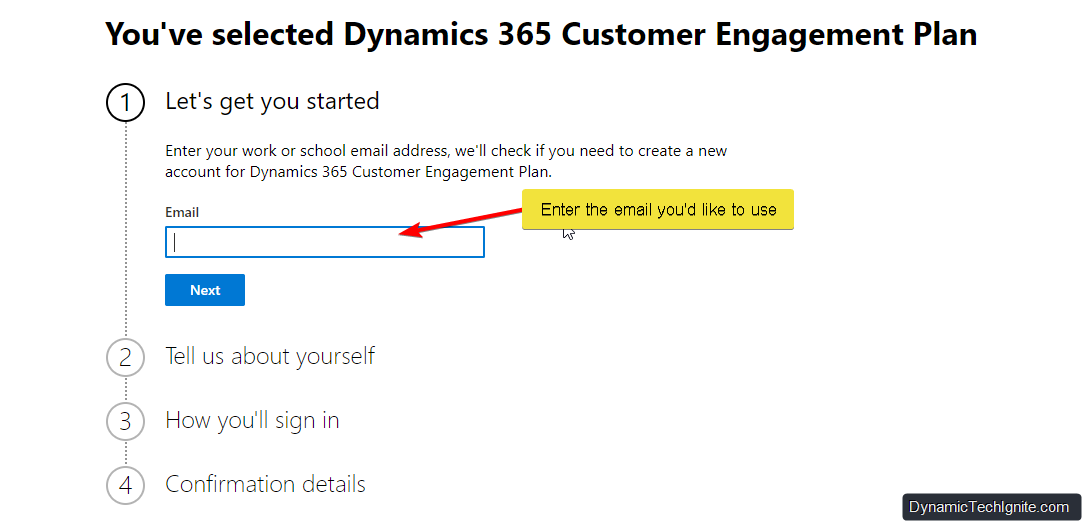
then you will see below information, and text box where you can enter the email that you’d like to use (btw, you can provide your personal email address instead of business email address)

image-20210908000229560

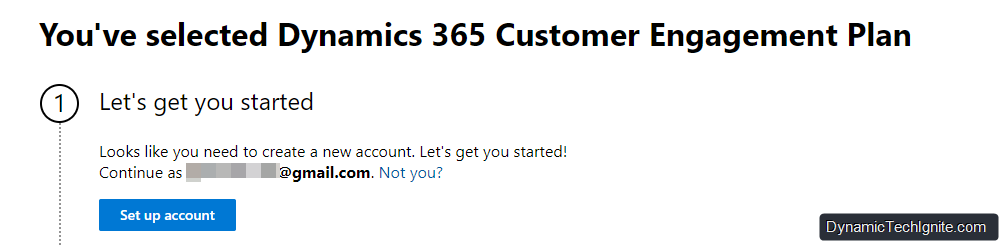
then you will below information, and you can go ahead to click on "Set up account" button.

image-20210908000324104

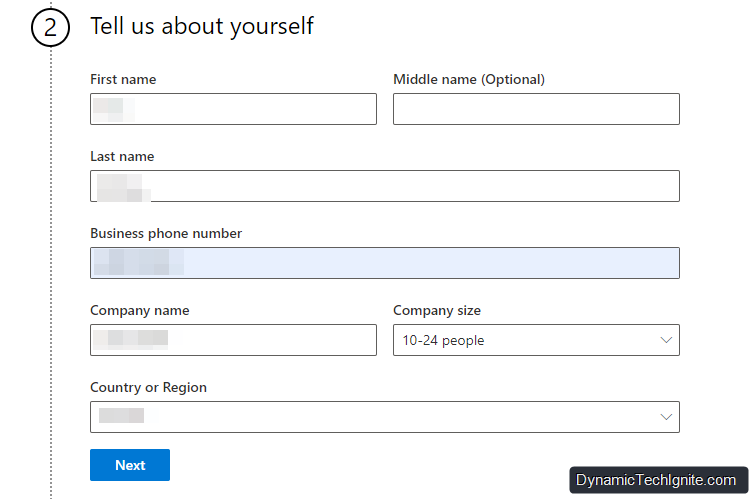
after that, you can continue to populate below fields accordingly, then click on "Next" (tip: Country or Region is important, as Microsoft will create this trial under the data center where is close to your selection)

image-20210908000742070

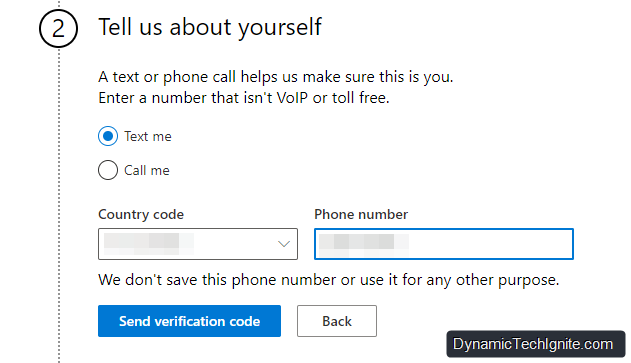
then you need to double check the country code and phone number to ensure nothing wrong, and also choose either "Text me" or "Call me". for instance, we will choose Text me, and we will get the verification code through the phone number provided by us,

image-20210908001156022

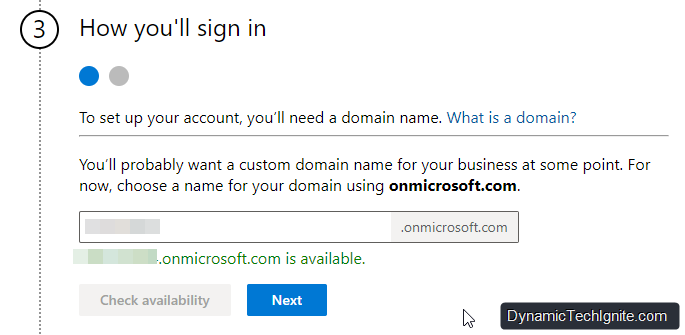
next, please choose a name for your domain using onmicrosoft.com (this name will be used to create your Office/Microsoft 365 account, and also as a temporary email address for you until your business custom domain is configured), and then check availability(ensure the name is unique), then click on Next if it’s available

image-20210908001800847

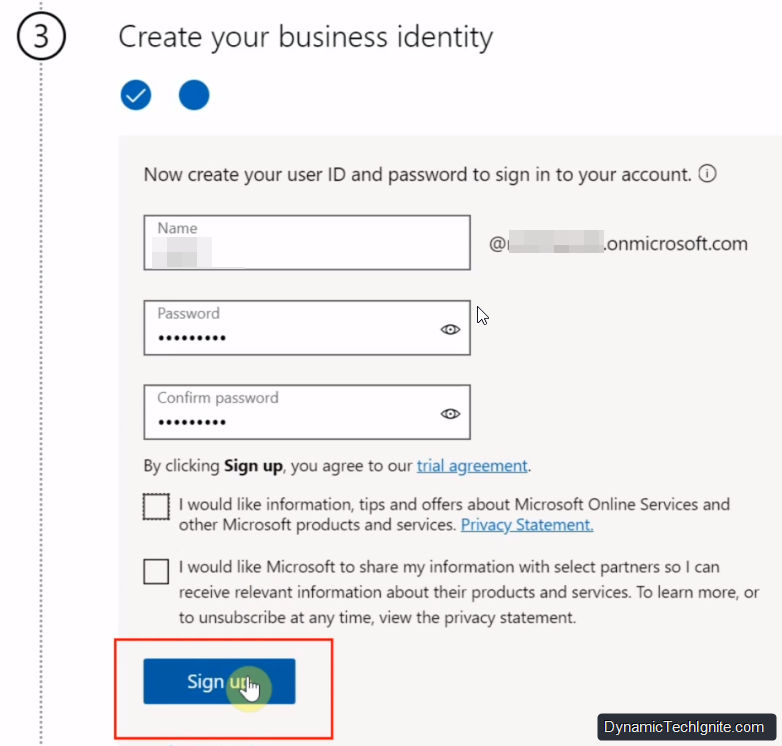
then you can populate the name for your user ID, and also double enter the password that you prefer, and then click on Sign up

image-20210908003124123

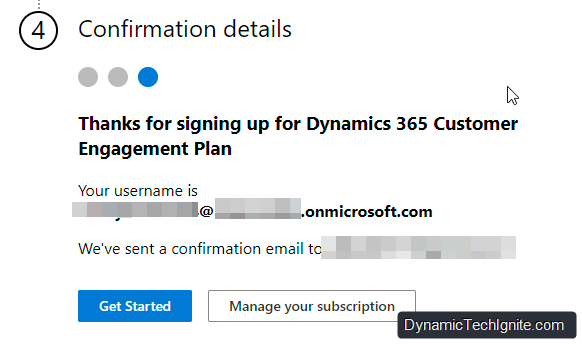
finally, you can review and confirm the details which you will use to log in later on(tip: you should note them down somewhere in case you will need to use them later when log in again), then you can click on Get Started to start interact with the trial instance.

image-20210908003444976

Step 4 Clear browsing data(optional)

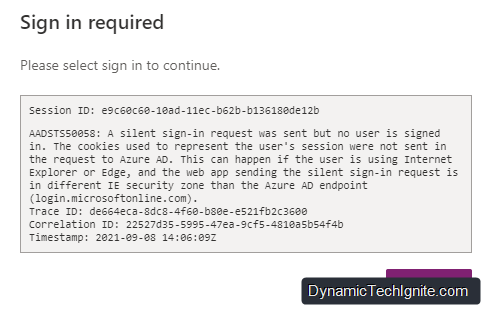
sometime, some of you may have got the trial instance before, and now just try to apply for another one. if that’s the case, you may come across below log-in issue.

image-20210908101650226

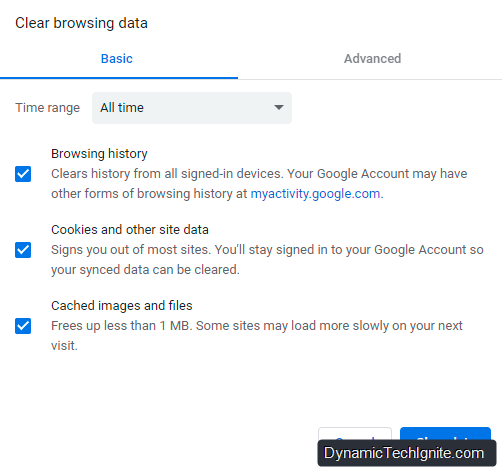
then what you have to do is to clear your browsing data (below is a example when doing it from Chrome)

image-20210908101219426

Step 5 How to create a new environment that has a CDS built for it

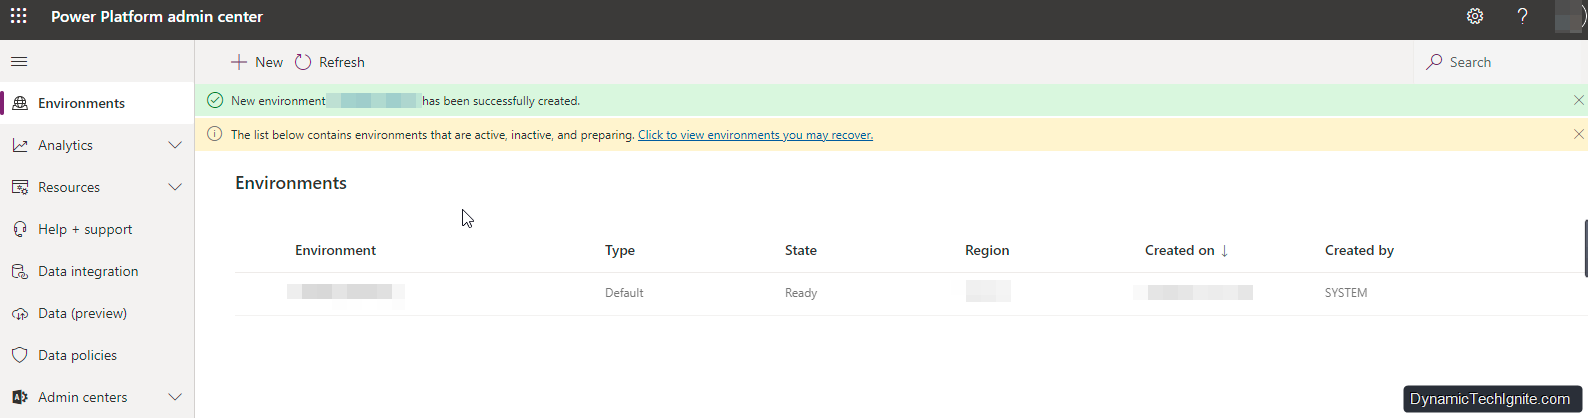
Once you log in (https://admin.powerplatform.microsoft.com/) successfully, you will see below Power Platform admin center page where you can configure and manage different environments (instances) of Power Platform. You should not use the existing default environment that you see on the page, instead you should create a new environment that will has a CDS (database) configured for it automatically by the Microsoft. so then what you need to do is just click on "+ New" button on the top-left.

image-20210908102257253

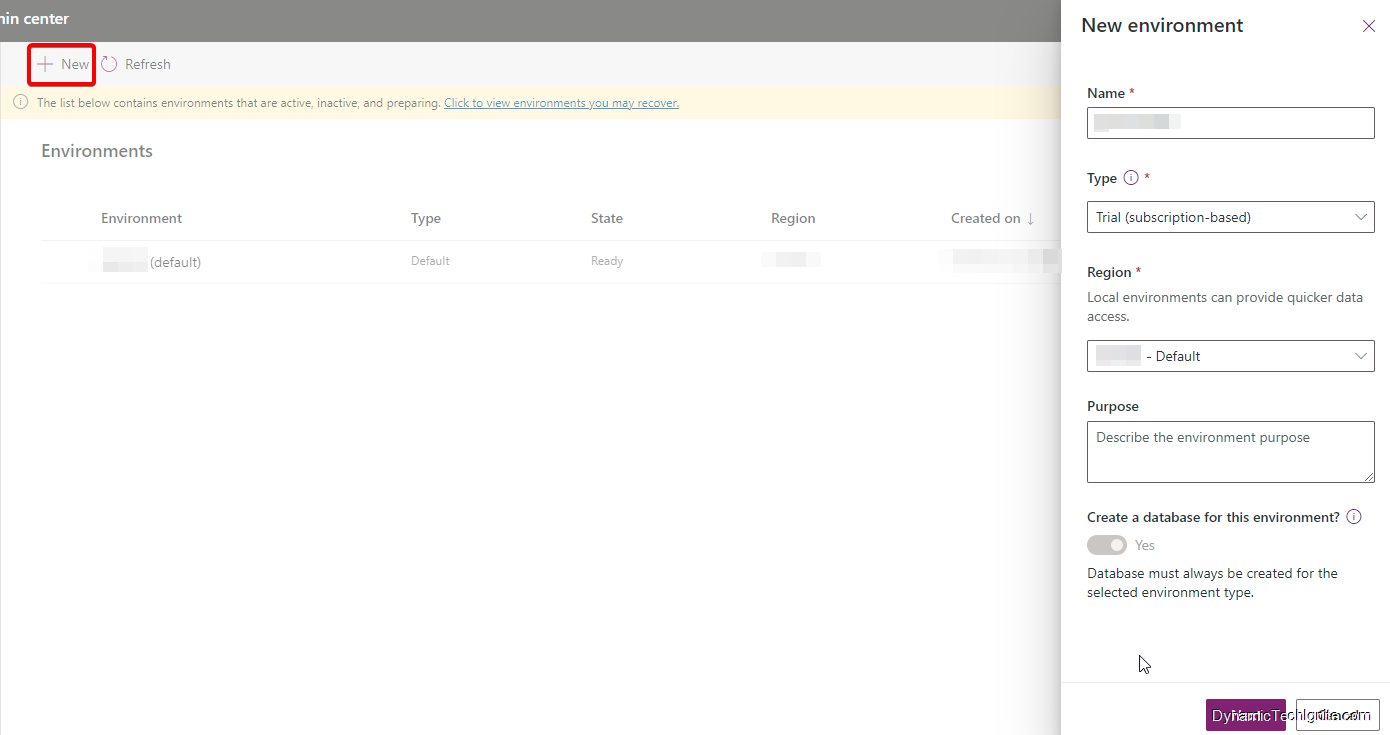
after clicking on the New button, you will have to populate the Name field with the name you prefer, and then choose Trial (subscription-based) for the Type field, and also choose the closest location (data center) for Region field. then, clicking on Next at the bottom. (you will see that option "create a database for this environment" greyed out, and being set up "Yes" automatically, which means the CDS for this new environment will be configured automatically).

image-20210908180118232

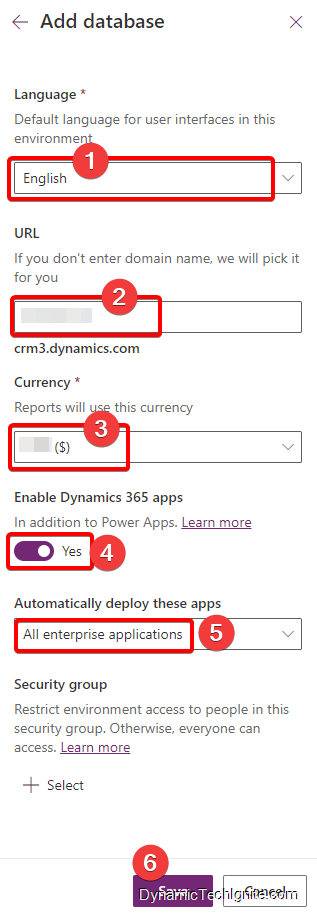
next, you will have to go through below steps:

  1. choose the Language,
  2. enter the custom domain name you have (otherwise it will use the default one, something like org7a5fae65), which can be changed later on as well.
  3. choose the currency for the entire environment
  4. if you’re a beginner, I suggest that you also enable Dynamics 365 apps
  5. and choose All enterprise applications
  6. finally, click on Save button

image-20210908180915730

at the end, you will see another environment has been created other than the default one. Please note that there is no database behind the default environment.

image-20210908181821449

after above steps, you will be able to start using the Dynamics 365 Apps, such as Sales hub, Customer Service hub, etc.

Sunday, September 5, 2021

Tip – CRM tracking token#(auto-generated) in the reply emails


Scenario:

  1. One of agents sent an email to a client who is an existing Contact in CRM (the tracking token# is also generated automatically)
  2. then the client sent a reply email back to the customer service/support queue (the subject of the email also includes the token#)
  3. once CRM gets the email, CRM will verify the Token# first to see if there is any existing record that has the same token#, if so, CRM just associate it with the existing record, otherwise, the related Record creation and update rule will be triggered

image-20210902120438850

Saturday, September 4, 2021

How to perform an unbound action


Unbound actions aren’t bound to a table and are called as static operations. Unbound actions are performed on the entire environment, not on specific tables or rows.

To perform an unbound action in your flow, add Perform an unbound action to your flow.

Follow these steps to edit one of your flows to perform an unbound action.

  1. After any step in your flow, select Add new step.
  2. Enter unbound in the search box, select Microsoft Dataverse from the list of connectors, and then select Perform an unbound action.
  3. Add an unbound action to your flow by typing the name "Perform an unbound action" in the search box.

202109012032941.jpeg

  1. In Action name, select an action.

202109012033103.jpeg

  1. Enter or select any of the optional details on the Perform an unbound action card.

  2. Save, and then run your flow.

  3. Confirm that the unbound action completes successfully.

Scenario: Sending an auto-reply email using a email template

Assumption before below steps, you already create a case record through one action step of this Power Automate flow

1. Initialize the variable for storing the email template GUID

Select "Initialize variable" step (this variable will be used to store the Email template GUID)

step 1 enter a name for the variable

step 2 set up the data type for this variable (it is important otherwise you will see error moving forward, as the variable can’t store the value that it is not set for)

image-20210901223514724

2. Select "List rows" step of Dataverse

choose Email Templates table(entity), then in the text box for Filter rows(Use to define an OData-style filter expression to narrow down the set of rows that Dataverse returns), enter title eq ’email template name’

image-20210901224824081

3. Set variable

try to add dynamics content to the value text box by searching for unique identifier of the email template (GUID of the email template record that was found by the previous step)

image-20210901230236249

4. Repeat the same steps 1 to 3, in order to get the GUID of the queue record that we’re looking for

image-20210901231811594

image-20210901231836190

image-20210901231930001

5. Select the action called "SendTemplate"

step 1 Add the Email Template ID variable to TemplateId

step 2 Add the Queue ID variable to Sender

step 3 if you try to send the email to the case related customer, then you can just add the Case entity logic name as well as the GUID of the case record that was created in the previous step of this flow (please note the logic name must be plural)

step 4 Associate this email record with the related case record

image-20210901232325468

6. Save this flow and perform the test