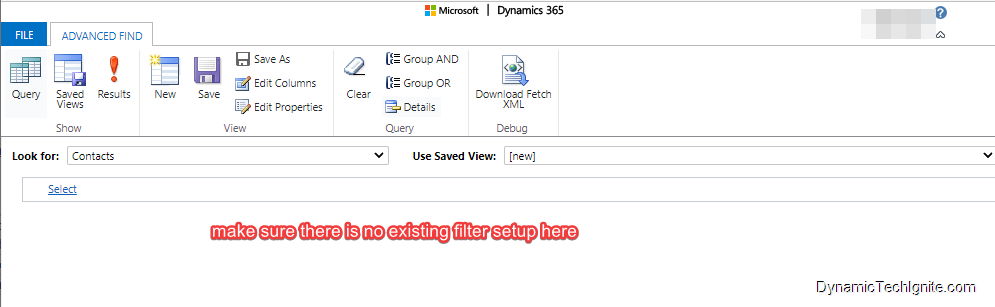
Open the xml file using notepad++ or any other text and source code editor that you can get, then follow below steps:
Press Ctrl + A on your keyboard to select the entire script
Press Ctrl + J on your keyboard to change xml to a single string, and then assign it to a variable fetchxml (you can also use other name as long as it meet Naming and declaration rules for variables of JavaScript)
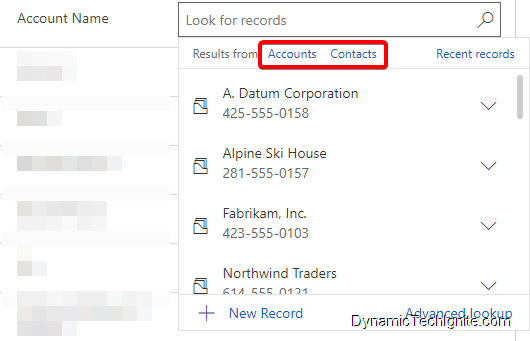
below is a screen shot of the layout from new Unified Interface
Legend
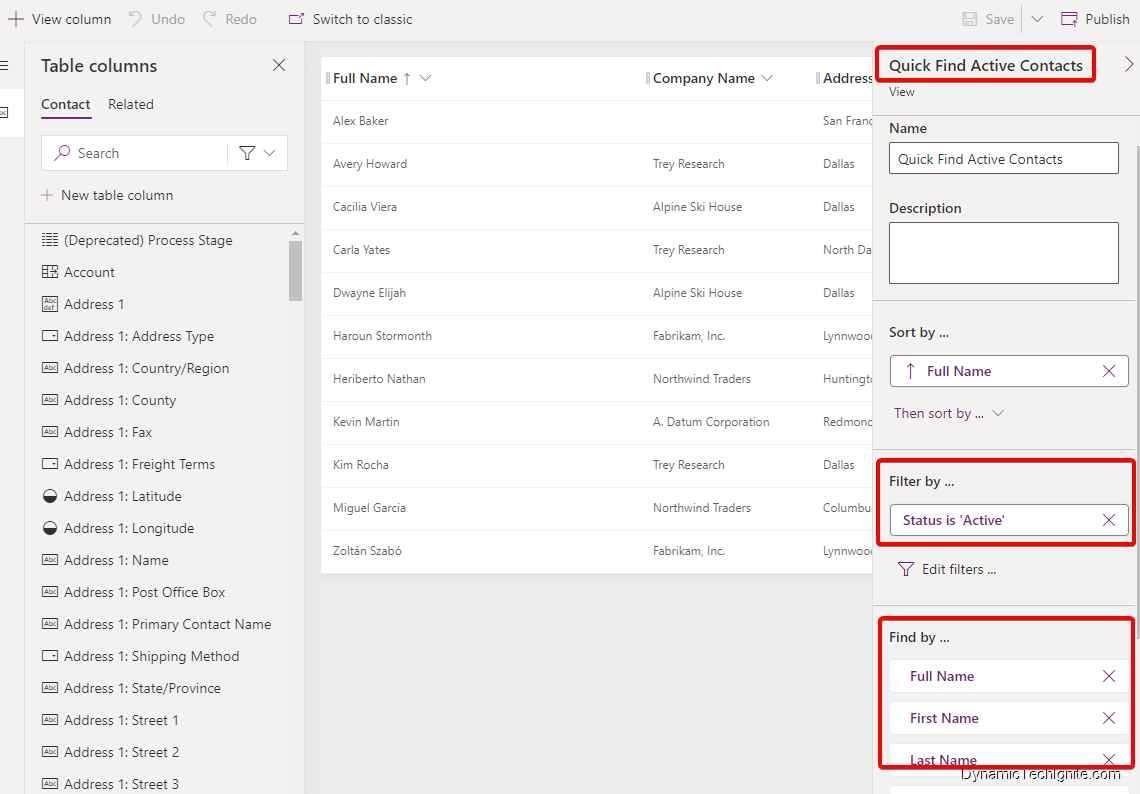
Look for records: Select the textbox and type your search criteria to look for rows.
Recent: Rows that were recently searched (new unified interface)
Note: for the legacy web client, only the first three columns (from left to right) of the related entity Lookup View are displayed.
New Record: Create a new row.
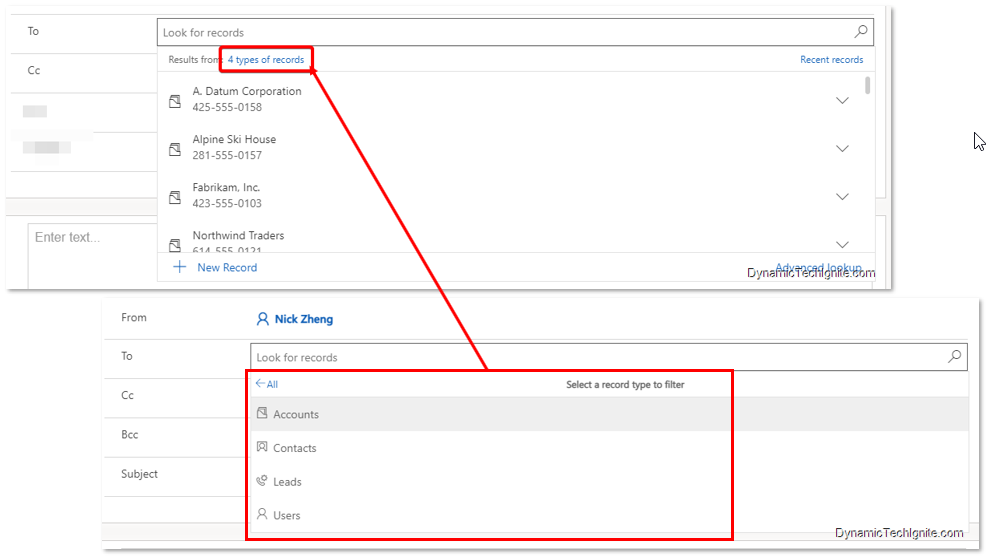
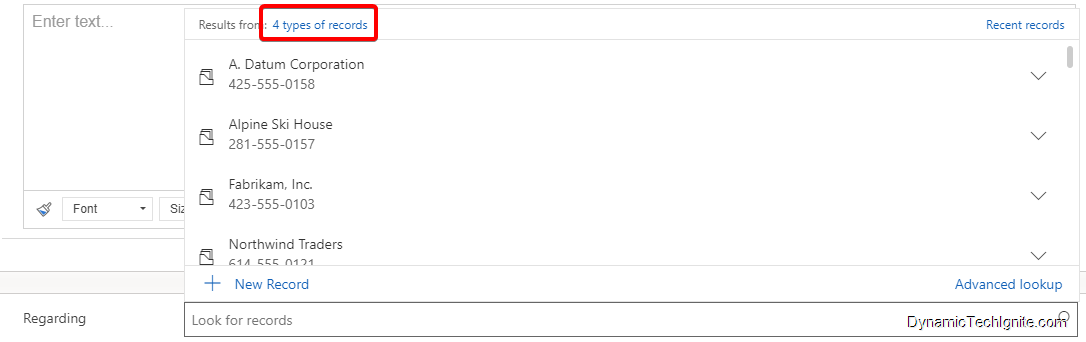
Types of records: Select to filter by a table type such as Contact table or Account table. The number in front of type of records represents how many table are available to filter from.
Browse in a lookup column: To browse a lookup, select the lookup icon (magnifying glass). A full list of items will be shown in the dropdown.
Expand item: the first two columns are shown, and clicking on the dropdown will show all Lookup view columns. Some lookups such as Customer – which can be either Accounts or Contacts – display both to be selected as shown in the above screenshot. For more information on keyboard shortcuts, see Use keyboard shortcuts in Power Apps.
Change View: by clicking on Change View – if the data filter applied to the Lookup View excludes the data being searched for. For example, the Account Lookup view filters on Active Accounts only by default, so selecting another view may be more appropriate. For more information on views, see Use grid filters.
In today’s post, we will use the the out of the box Primary Contact lookup field on the account form as a example,
Different Views that will be involved
Two views of the contact entity will be involved:
Lookup View:
A typical Lookup View of contact entity is shown as below -> the view you will see when select the textbox of the lookup field.
There is one lookup view per entity. Lookup views cannot be deleted or deactivated, but they can be edited. You are unable to create any additional lookup views at the moment.
Quick Find View
A typical Quick Find View of contact entity is shown as below, where you can also setup the Find by property that means based on which fields (columns) the search will be performed -> the view you will see after searching the results in the textbox of the lookup field.
When entering a value into a lookup field and the button or lookup icon is pressed, a search is carried out on the related item’s data using the Find columns defined in the related entity’s Quick Find View
Configure Lookup view for a lookup field on a form
we still use the Primary Contact lookup field on the account form as the example
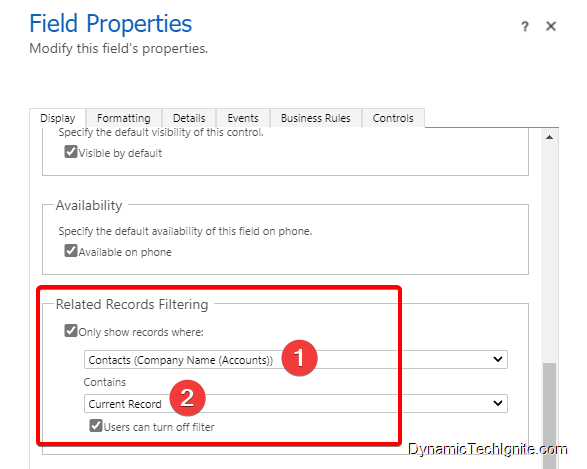
Go to the solution -> navigate to Account entity -> find the main account form and open the classic form designer -> find the Primary contact field and double click on it to open the Field Properties configuration window.
FILTERED LOOKUPS
Filtered lookups will display a subset of records when looking up to an entity.
For instance, Account entity has an out of the box lookup to Contact entity called ‘Primary Contact’. by default, this lookup is filtered to only show Contacts who have the current record (#2 indicated by below screen shot) as their Parent Account, which means that you can only enter someone as the Primary Contact for an Account if they work at that Account. This makes sense.
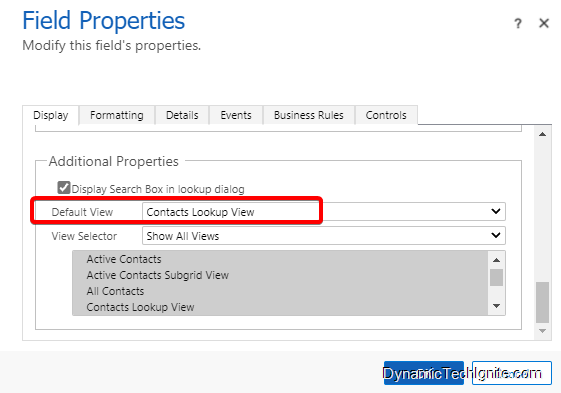
Default view in a lookup field
If you’d like to set up the default view in the textbox of a lookup field, when you select it, then you should configure in the Additional Properties section as below screen shot shown. You can switch to another view as well.
When configuring the lookup field on the forms, any other view could be chosen as well.
Additionally, View Selector can be locked and/or limited to user’s own records.
When you create a new lookup field you are creating a new Many-to-One (N:1) entity relationship between the entity you’re working with and the Target Record Type defined for the lookup.
There are additional configuration options for this relationship that are described in Creating and editing entity relationships. But all custom lookups can only allow for a reference to a single record (a single target record type).
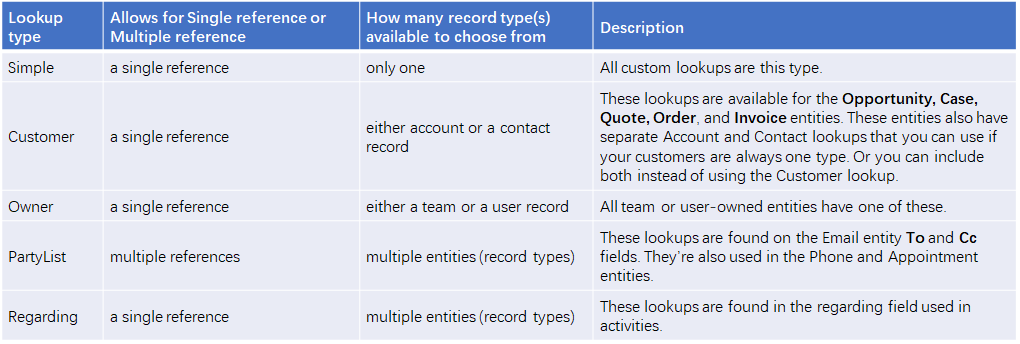
However, you should be aware that not every lookup behaves this way. There are several different types of system lookups as shown here.
Customer: Allows for a single reference to either an account or a contact record. These lookups are available for the Opportunity, Case, Quote, Order, and Invoice entities. These entities also have separate Account and Contact lookups that you can use if your customers are always one type. Or you can include both instead of using the Customer lookup.
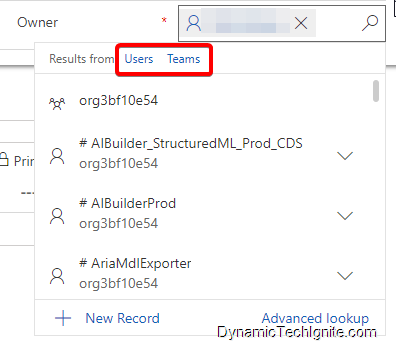
Owner: Allows for a single reference to either a team or a user record. All team or user-owned entities have one of these.
PartyList: Allows for multiple references to multiple entities. These lookups are found on the Email entity To and Cc fields. They’re also used in the Phone and Appointment entities.
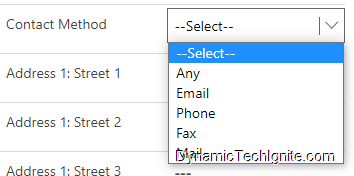
the partylist allow you to select multiple reference shown as below snap shot
Regarding: Allows for a single reference to multiple entities. These lookups are found in the regarding field used in activities.
When you’re using Power BI, Excel, etc., you may come across some data format issues, when you try to import some data that contain the Date & time, Number, or Currency data type. it’s probably because that your system Regional Setting may be not able to recognize those data, for instance, US-specific date format should be like (MM/DD/YYYY), but if your system Regional Setting set the date format as (YYYY/MM/DD), then you will see the errors during the data importing.
with that being said, you should be able to fix the issue by following below steps,
Method #1
Windows 10
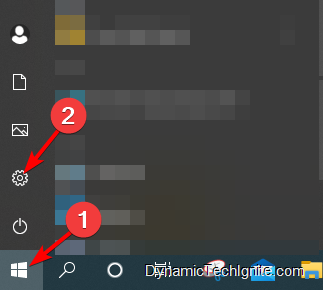
\1. Click the Start button at the bottom left corner of your screen, and then click Settings
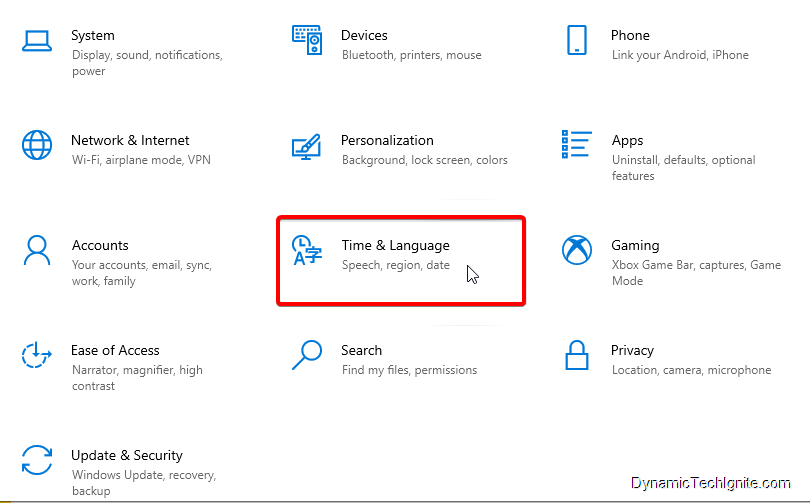
\2. Click Time & Language
The new window pops up, where you can set up the Region format.
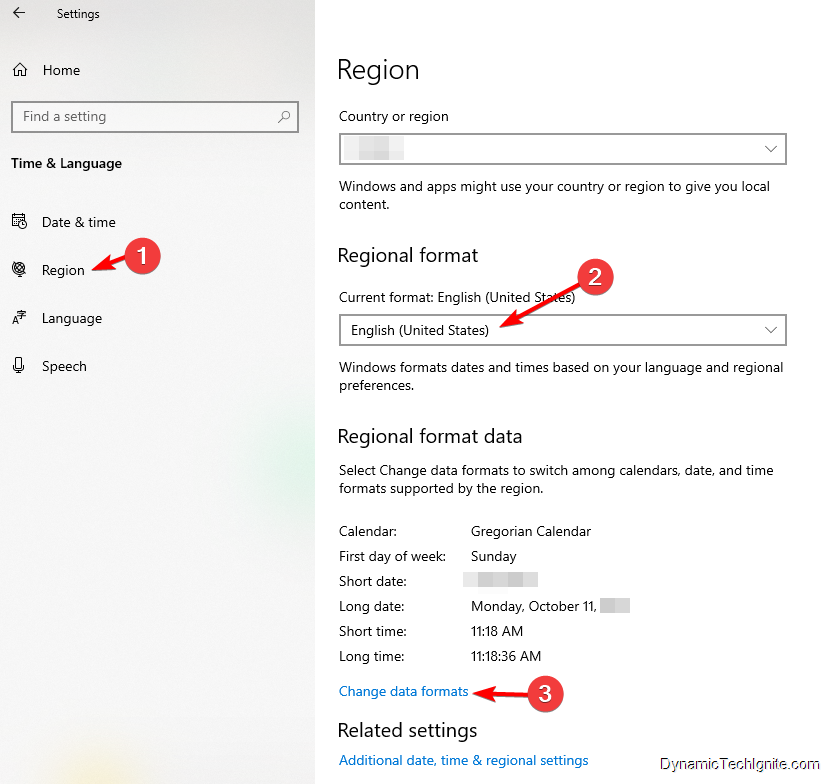
\3. Under Regional Format item, select the format you want to change from the drop-down list, and then click the Change data formats button
The Change data formats dialog box appears. Click the placeholder that contains the settings that you want to modify and make your changes. For example, to change part or all of a short date format, click the Short date: dropdown list and change the setting that you want
Method #2
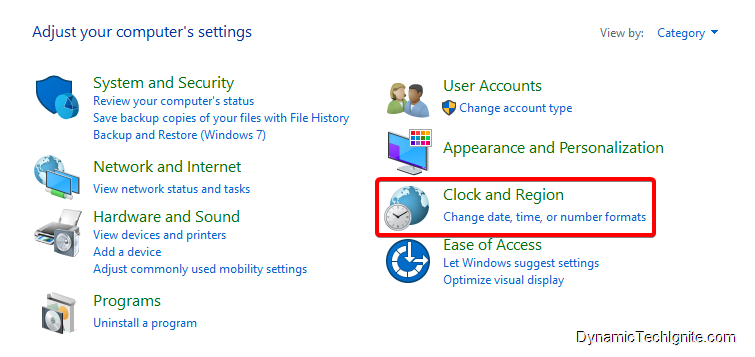
\1. Navigate to the search bar at the bottom left corner of your desktop screen, and then search for Control Panel
\2. Click Change date, time, or number formats, then you will below new window popping up
\3. Select the Formats tab, select the format you want to change from the drop-down list. then you can also click the Additional Settings button
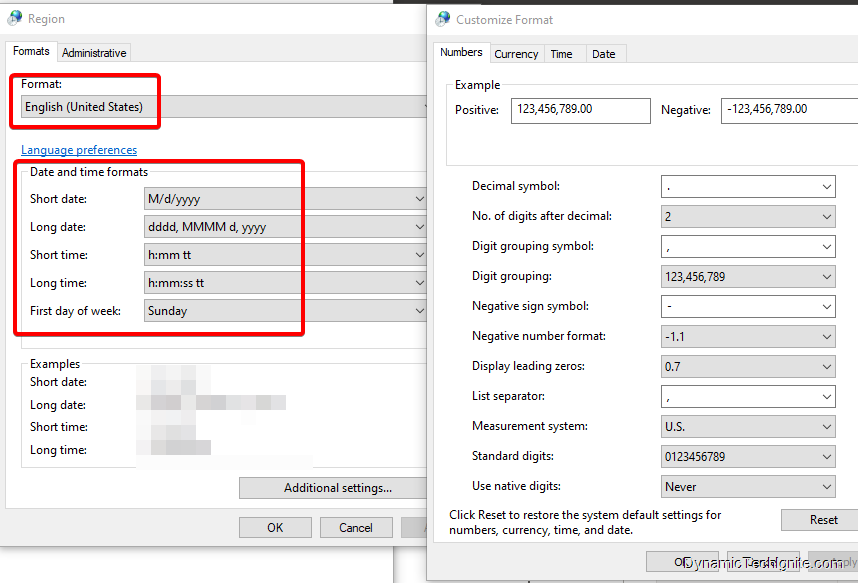
The Customize Format dialog box appears
\4. Click the tab that contains the settings that you’d like to change. For example, to change a number format, click the Numbers tab and change the setting to fit your needs.
For some of you that just start using XrmToolBox the 3rd party tool recently, and you may be wondering how to make a connection to one of your Dynamics 365 (CRM) environments as soon as possible, then you can utilize those amazing 3rd party tools in it to improve the efficiency of your learning, development or validation , ect. for your projects.
If that’s the case, you come to right place. Without further ado, let’s get started.
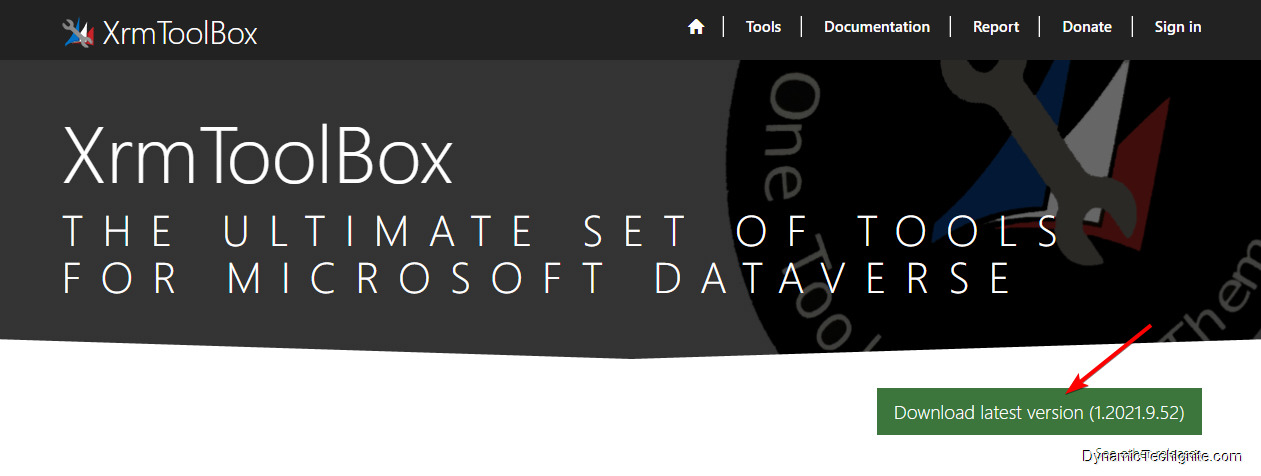
After download the zip file from below link, then you can unzip the zip file to a folder where you think it fits
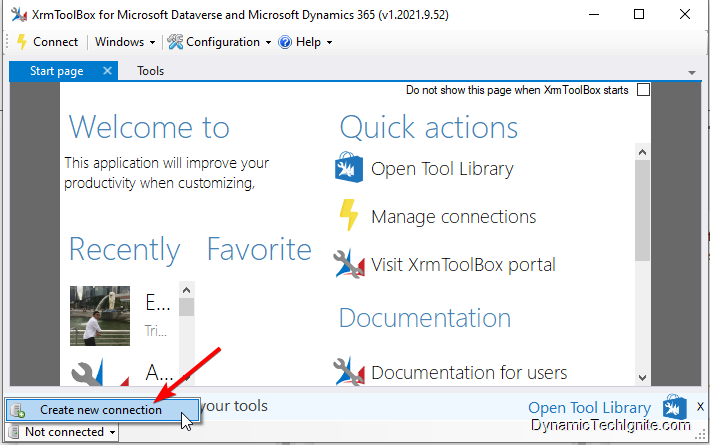
then after clicking on and open the XrmToolBox tool, you will see below window, then you can hover over to the bottom left corner to Not connected, and create a new connection from there.
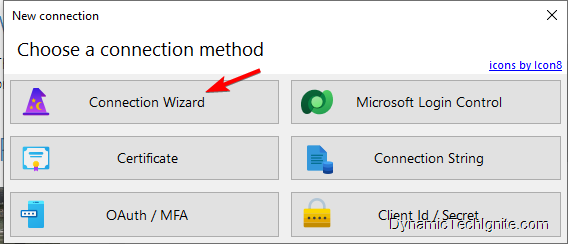
Choose a connection method
then there will be a new window popping up, where you can choose which connection method you prefer. if you are new to XrmToolBox, you could just go with "Connection Wizard" option,
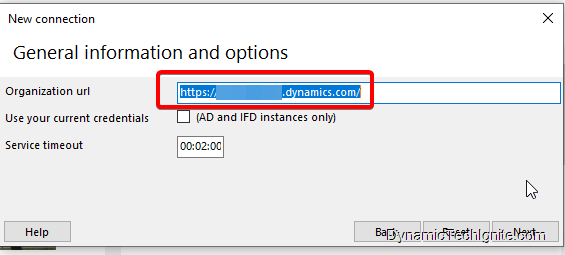
General information and options
after clicking on and open the wizard, you will see below window, where you have to use your own organization url to replace the existing value of the Organization url placeholder, then click on Next,
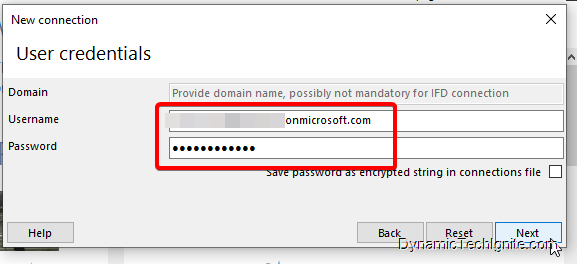
User Credential
you need to enter your Username and Password to the placeholder respectively, then click on Next. After that, the tool will validate your credential.
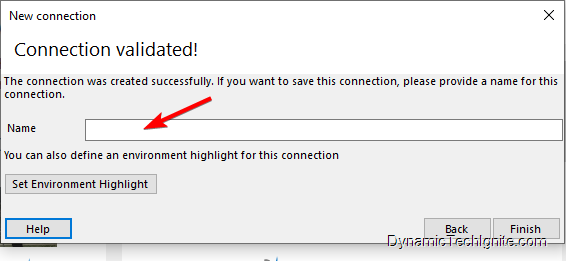
Enter a name for this connection
you need to input a name that is meaningful for yourself into Name placeholder, and click on Finish button.
it’s done right away. it’s so simple and straightforward, right?
Tip - How to change Default Font style and size for email form in Rich text editor control in Dynamics CRM
Scenario:
Sometimes, we would come across a business requirement to change the default font for email forms or some other forms. Unfortunately, there is no such out of the box feature in Dynamics 365 (CRM) for users to utilize in order to fulfill this requirement at the moment; however, we can still use JavaScript to achieve it. below is how.
First of all, you can refer to below link from Microsoft for the sample code:
There are two types of configurations: the defaultSupportedProps section, and individual configuration settings that provide various functionality.
today, we will use defaultSupportedProps to configure the default font style and size for one of the email forms. Below are the key attributes of rich text editor control that we will update and configure:
font_defaultLabel
fontSize_defaultLabel
stickyStyle
defaultSupportedProps
You can configure all of the CKEditor-supported properties under this property. A few of the commonly used and custom configurations are described below. For complete documentation about CKEditor configurations, see CKEditor.config.
Attribute
Description
Default value
font_defaultLabel
Sets the default label that is displayed in the toolbar for font style. The default is Segoe UI.
"font_defaultLabel": "Segoe UI"
fontSize_defaultLabel
Sets the default label that is displayed in the toolbar for font size. The default is 9.
"fontSize_defaultLabel": "9"
stickyStyle
Sets the actual default font size and style. Additionally, you can include any other CSS properties you'd like to set as part of your default styling. The stickyStyle plugin creates a wrapper around your content using the element specified by "stickyStyles_defaultTag", which is initially configured as "div".
Some of us may have no idea at all for which font we should pick from above code snippet. If that's the case, you may refer to below link for some reference and knowledge about Font definitions.
there is also another workaround to find out the actual default font size and style as shown below:
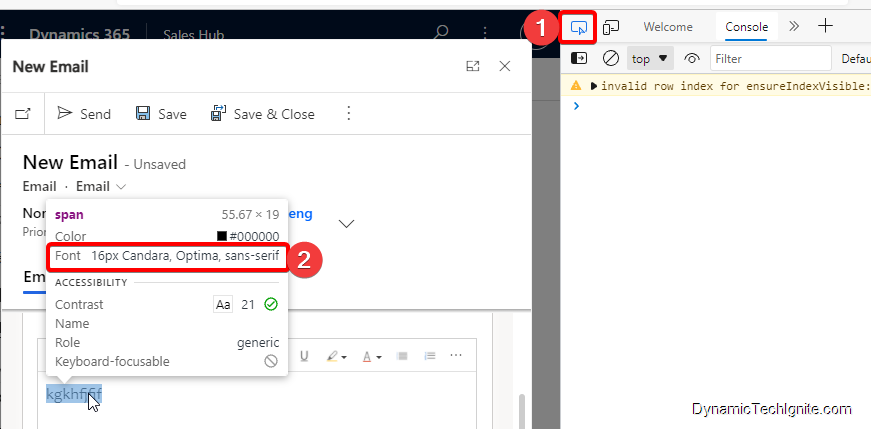
open the Developer Tools in Edge or chrome browsers, and hover over to those random text, then the Font information will pop up right away, which will give the idea which font you should go with.
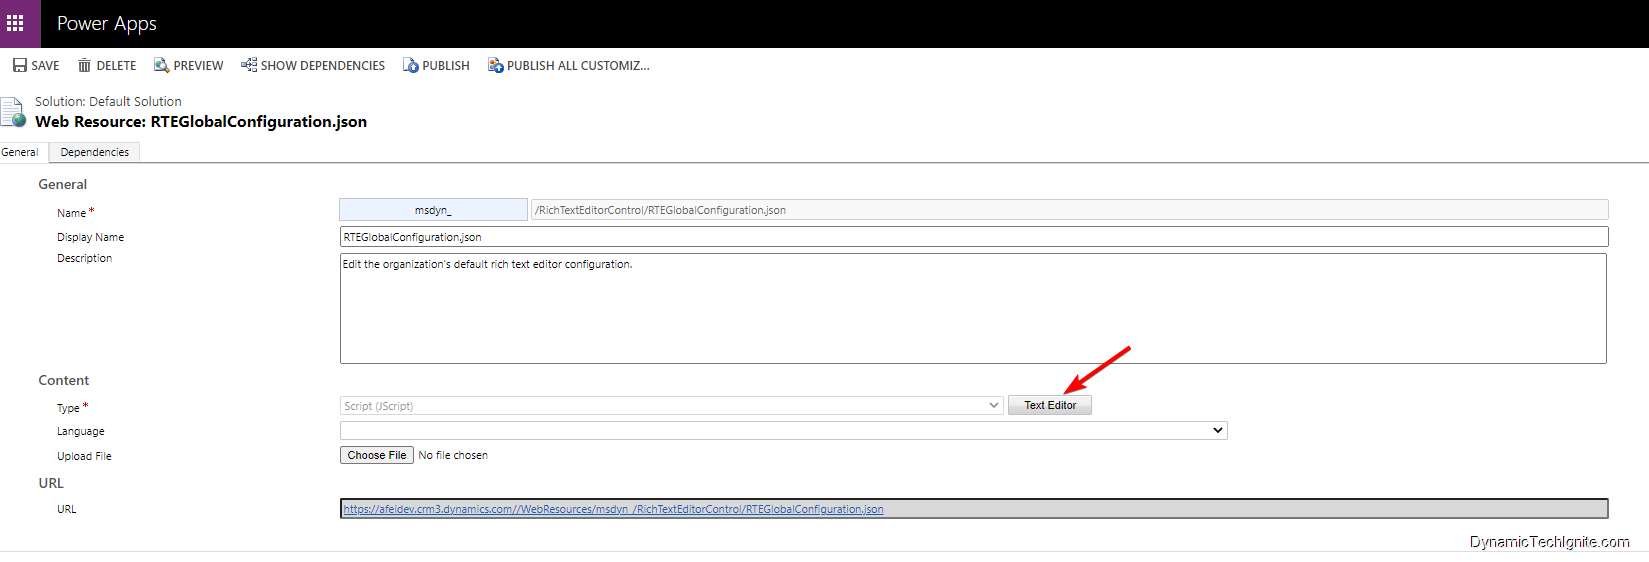
How to update the sample code data
Sets the actual default font size and style
Sets the actual default font size and style as below script (for the actual text that you will enter in the text box)
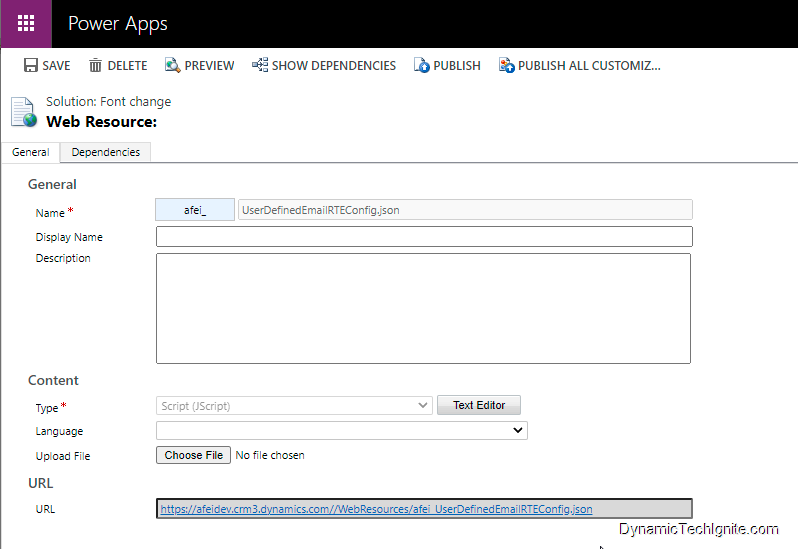
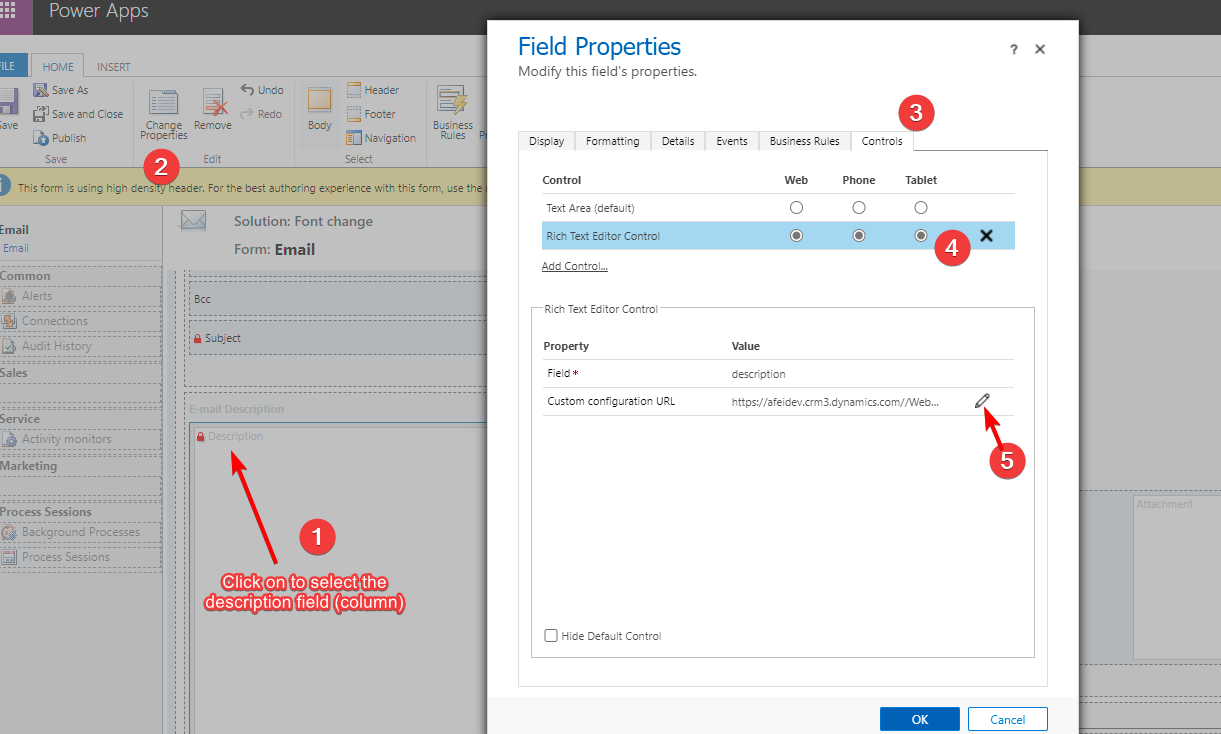
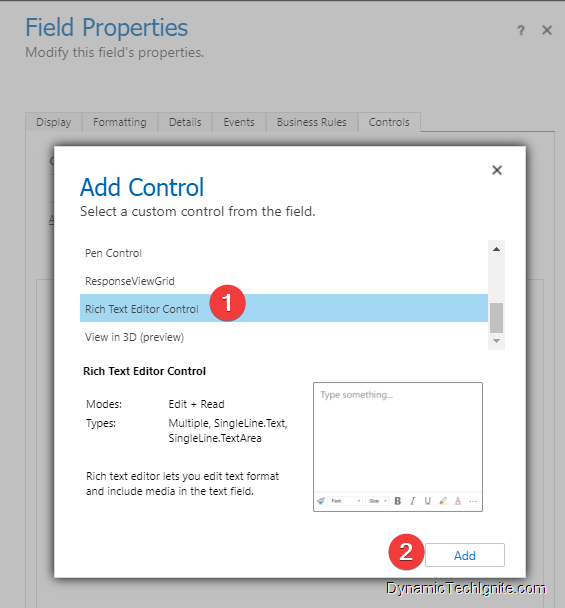
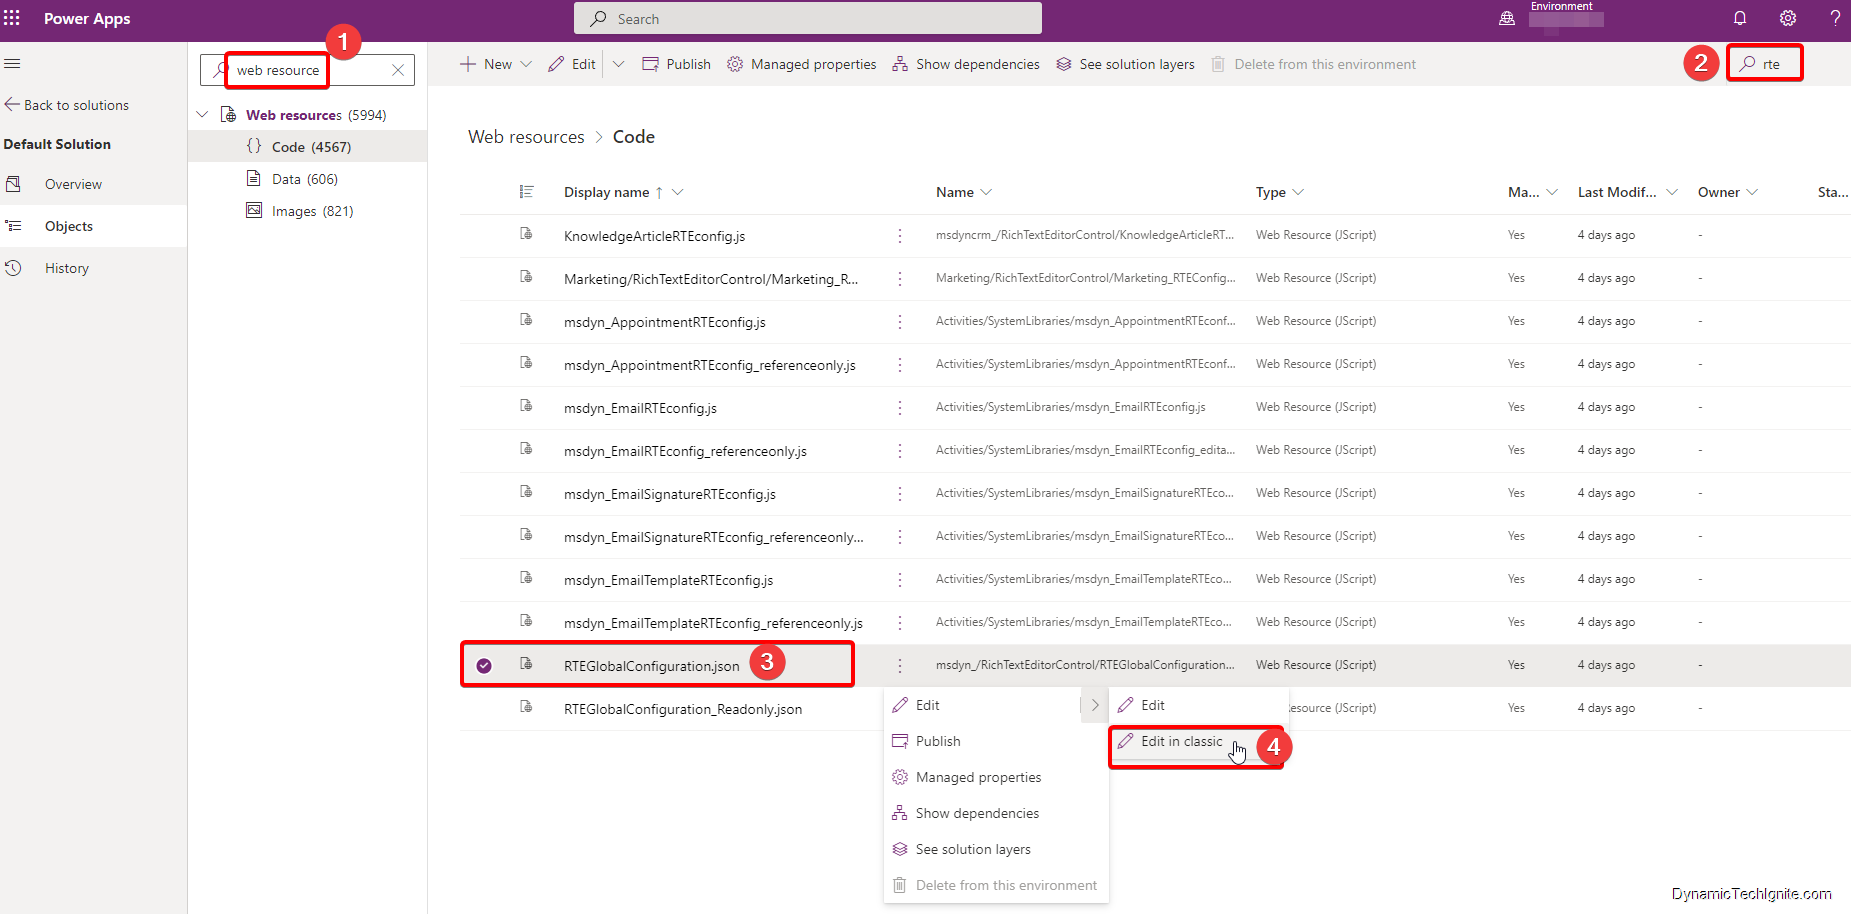
Add the newly created web resource to the Email form through the Rich Text Editor Control
below are the steps:
then, find the control and click on Add,
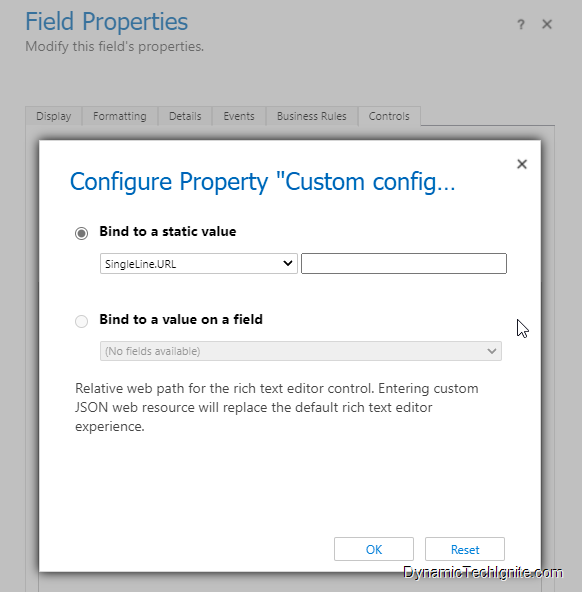
Next, click the Pencil button to open Custom configuration URL property (make sure that you also select Web, Phone, and Tablet if you want all client apps to have the ability to use rich text in the column),
then, on the Custom configuration URL property page, Select Bind to static value, enter the relative URL to the JavaScript web resource in the box next to SingleLine.URL, and then select OK. The relative URL is located on the web resource definition.
Note:
For example, if you create an HTML page as a web resource named “new_myWebResource.htm”, you could open that page in a browser using a URL like this:
<base URL>/WebResources/new_myWebResource.htm
but when you add it to the Rich text editor control, please make sure you only use the relative URL like this:
/WebResources/new_myWebResource.htm
Select OK to close the Column Properties page.
On the form editor command bar, select Publish.
Note:
the Rich text editor control component can only be added to the main form at the moment. you can't add them to Card form or quick view form etc.
email for interactive experience has to be configured through the legacy interface.
You can also refer to below link for the training material from Microsoft
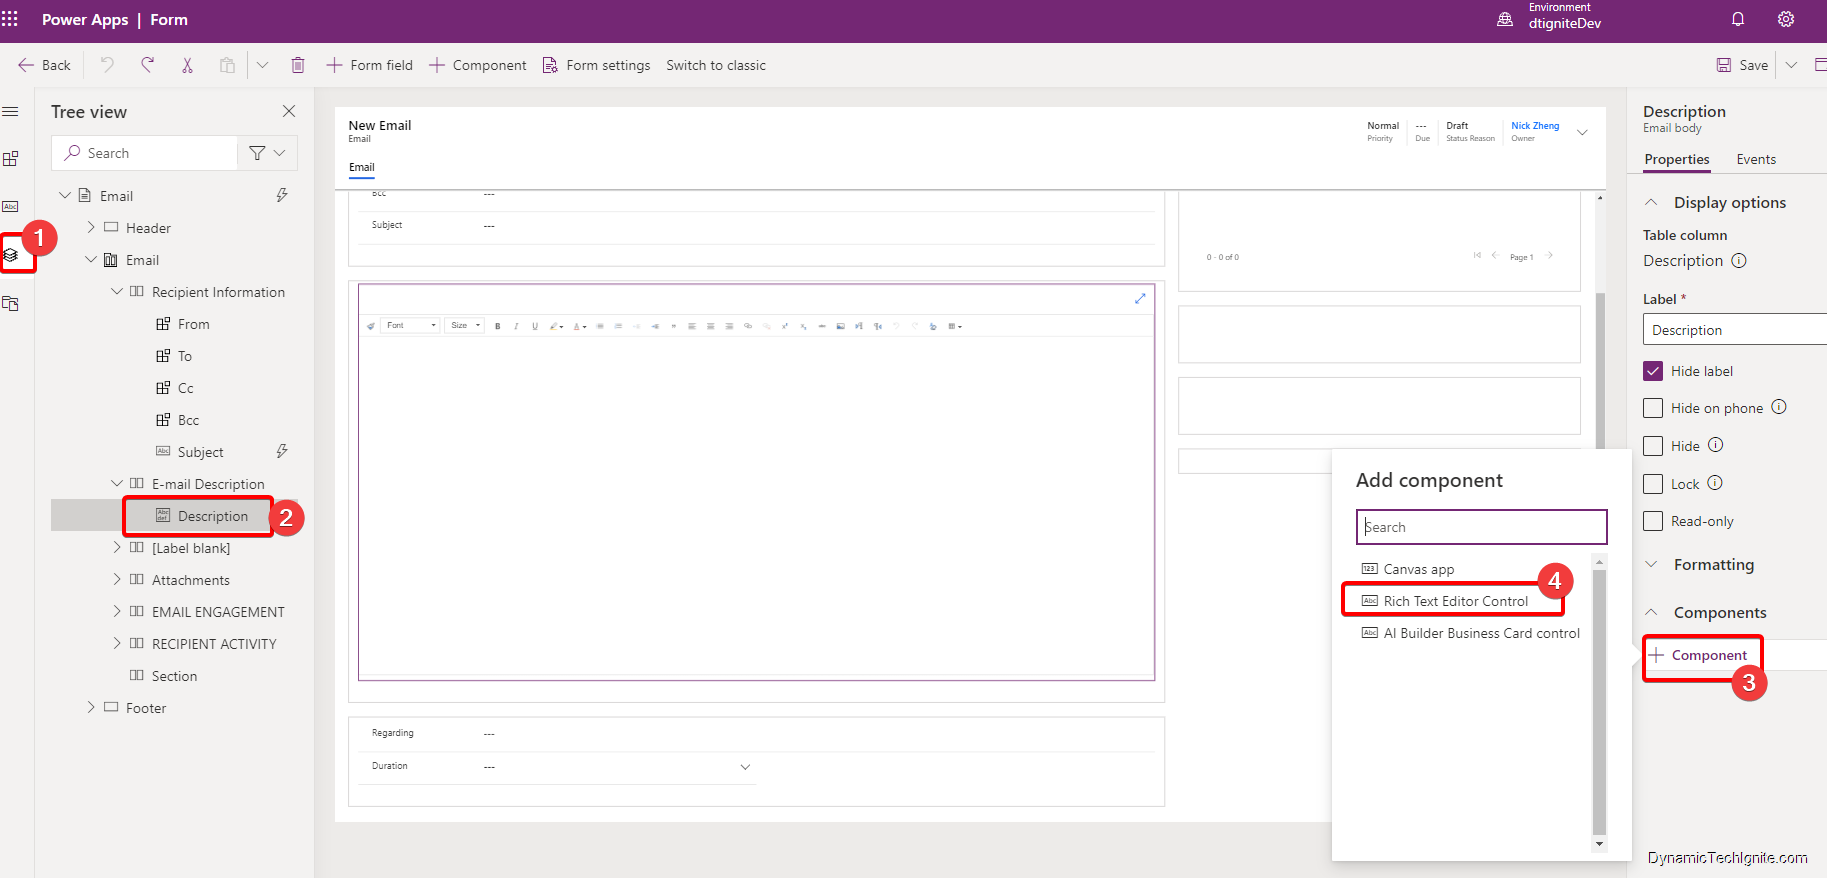
if you would like to only use this web resource to update certain forms rather than making organization wide changes, then I suggest you to copy the script and make a new web resource, after than, you can refer to below configuration steps in the new Power Apps interface to fulfill the requirement.
for instance, I’d like to add this web resource only to one of the email form, then I just follow below step to add the control to the form component.
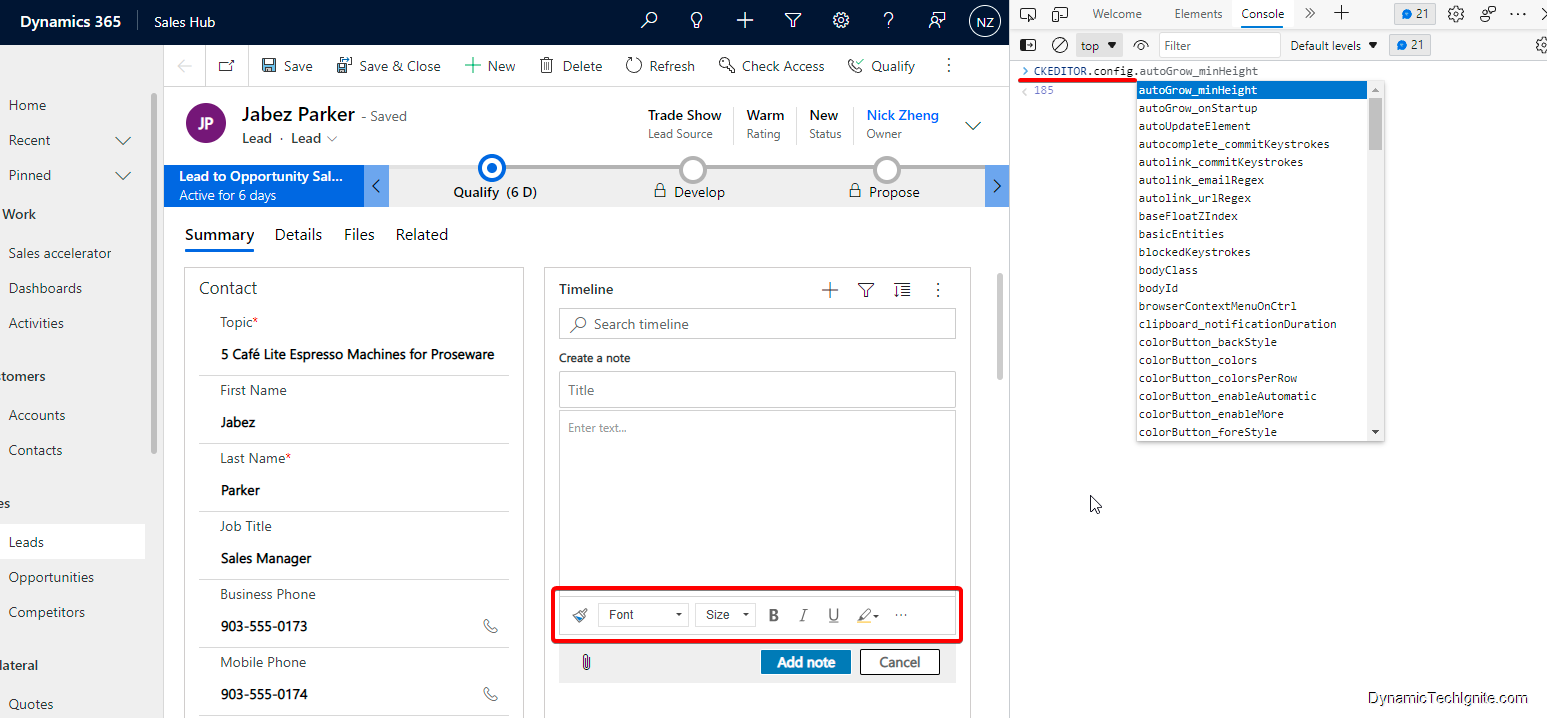
In a Microsoft Edge or Google Chrome web browser, run your model-driven app and open a form that has the rich text editor control, such as an account row.
Press F12 on your keyboard to open the Developer Tools from the browser
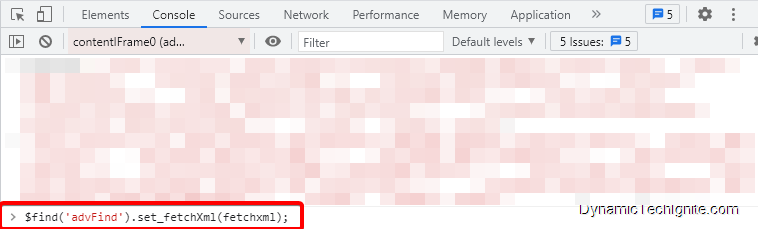
Select the Console tab, and then select the parent Main.aspx page in the drop-down list box on the command bar, or you can clear console first, then input
> CKEDITOR.config.
then a list of properties will show up after the dot, where you can select the property you’re look for to find out the current setting for the rich text editor configuration.
sometimes, we have to check if the field contain data or is empty under the Condition action in a Power Automate flow, and we may be confused about which expression should be used to set up the condition.
Reference material from Microsoft
If you use logical functions or conditions to compare values, null values are converted to empty string ("") values. The behavior of conditions differs when you compare with an empty string instead of a null value. For more information, see the string() function.
Refer to below link for more details from Microsoft:
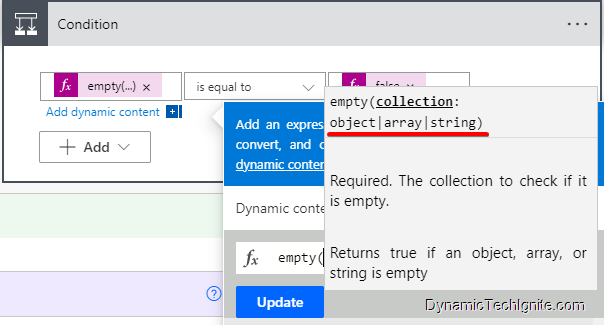
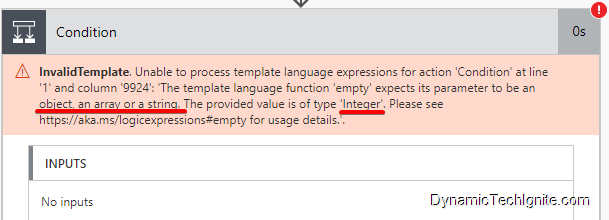
but please note that the type of DynamicValue should be String, Array, or Object only (most of time, it will be a string type), otherwise, you will see an error, for instance, if we try to use a option set (choice) field in the Empty function indicated below, then we will see below error message during the run.
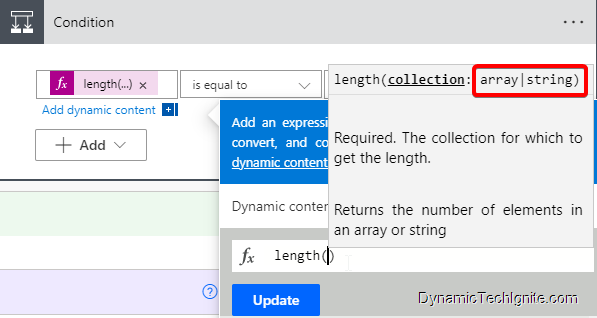
but please note that the type of DynamicValue should be String, Array only. for instance, you can use it to check the length of an array in order to verify if the file or option exists. If it’s greater than 0, the array is not empty. If it’s 0, then it’s empty.
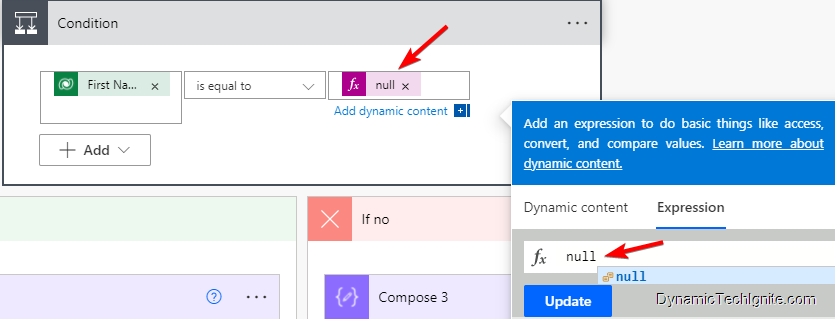
On the right side of the condition
If you intend to check if a field is empty or not (on the right side of the condition) , and then do something. there are also couple of ways you can refer to.
null keyword
Just open the expression builder as below pic shown, and enter null, then you will see below predefined value “null” show up, after that, you can just click on Update to add it in the condition on the right side for comparison.
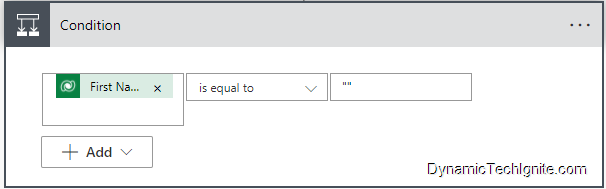
empty string ("") value
if you‘re sure that the data type of the field you’re using on the left side of the condition is a string, then you can just put empty string on the right side for comparison.